This 5 minute tutorial will walk you through steps to create a shadow fork of Ethereum Mainnet, add a shadow event to a contract, and retrieve its data.
By the end of this tutorial, you will:
Add a custom shadow event by editing the WETH contract
Test your changes
Deploy your changes to your shadow fork
Make a JSON-RPC request to retrieve your custom shadow logs
Login to with a Google account.
You should see a screen like the one shown below. The string after project_id= in the URL is your unique Shadow project ID (e.g. fc6ee70a-6f14-4a99-81db-6bd96226b95f).
Navigate to the WETH token contract page by pasting the contract address into the search bar 0xc02aaa39b223fe8d0a0e5c4f27ead9083c756cc2
Click the “Open in editor” button on the top right to open the in-browser IDE.
At the top of the contract on L27, define a new event schema called HelloWorld:
Then, add a line to emit a HelloWorld log at L74 with a custom message every time WETH is transferred:
After you’re done with your changes, hit the “Compile” button on the top right.
Test run your changes by simulating a transaction, and confirming that the transaction has logged your new shadow event.
Click the “Test Run” button on the top right, paste in the following transaction hash, and hit “Run”: 0x2ce5687567574b47c9406df5b65c1d9dd0d94bdcdde7109810b642c35599774b.
You should see your new HelloWorld shadow event in the right hand panel!
Now that you’ve tested your shadow changes, you’re ready to deploy the shadow contract onto your shadow fork. Just hit the “Deploy” button on the top right corner.
Now that you've deployed your shadow changes, you're ready to request the data from your shadow fork's RPC. Here's how you would make an eth_getLogs request from your terminal.
That's it! You have successfully generated custom data on your own shadow fork 🌗
Use cases
You can use Shadow to tackle several types of onchain data problems:
Teams can cut engineering time, get rid of adapters, and speed up indexing by writing shadow events from the contracts they care about. support the standard read endpoints, and are backwards compatible with existing web3 tooling like subgraphs.
Events often don't have all the data you will need. This can stem from a variety of reasons:
Events are missing entirely
Existing events don't emit information you need
Existing events emit inaccurate information
Existing events are structured in a way that make them hard to use
Analysts and researchers can take matters into their own hands and write shadow events into any contract. Write a custom event, quickly backfill its data for past transactions across a block range, and export it to your data tool of choice.
Smart contract developers can save their users up to 12% in gas on every transaction by decoupling data access from business logic, and moving non-critical event logs and view functions to a shadow fork. This has the added benefit of reducing the code size of contracts deployed on mainnet, which has a limit of 24KB (the Spurious Dragon Limit).
Reducing events on the publicly deployed versions of your contracts – and deploying them on a shadow fork instead – can provide significant optimizations to your contracts while flexibly serving all of the data needs for your project.
Developers and auditors can use Shadow to see inside the entire stack of any contract, and log everything they might want privately and gaslessly on a shadow fork. This enables fully comprehensive semantic logging to understand the inner details of any contract or transaction.
Shadow provides powerful and flexible data middleware that simplifies any indexing you may need to do downstream of events.
Shadow enables you to easily:
Materialize SQL-ready enriched tables
Make eth_call data event-driven instead of hammering RPCs
Unify data models for similar user actions across different protocols
Fetch token prices in USD with block-level accuracy
Get human understandable metadata
Token info (e.g. decimal converted values, symbols)
Pool/vault info (e.g. constituent token liquidity, tick prices, fees)
Shadow currently supports the following chains and networks.
If you'd like us to support a chain that isn't listed below, let us know at gm@shadow.xyz.
Chain
Network
Support
Ethereum
Mainnet
Factory contracts
What is a factory contract?
Factory contracts are a widely used pattern across DeFi in DEXs, lending pools, and yield vaults.
A factory is a contract that can deploy multiple instances of the same contract — we call these child contracts.
Generally, child contracts share the same functionality, but are typically initialized with different constructor arguments, which may alter the child contract’s runtime bytecode. Factory contracts are widely used across many protocols, including Uniswap, Compound, and Pendle – for example, there are 300K+ Uniswap V2 pools deployed by one factory contract.
Shadowing each pool contract individually would be a highly tedious and impractical process. Shadow provides powerful features that allow you to make one set of changes to a factory contract and link all of its child contracts to those changes.
Product guide
Identifying a factory contract
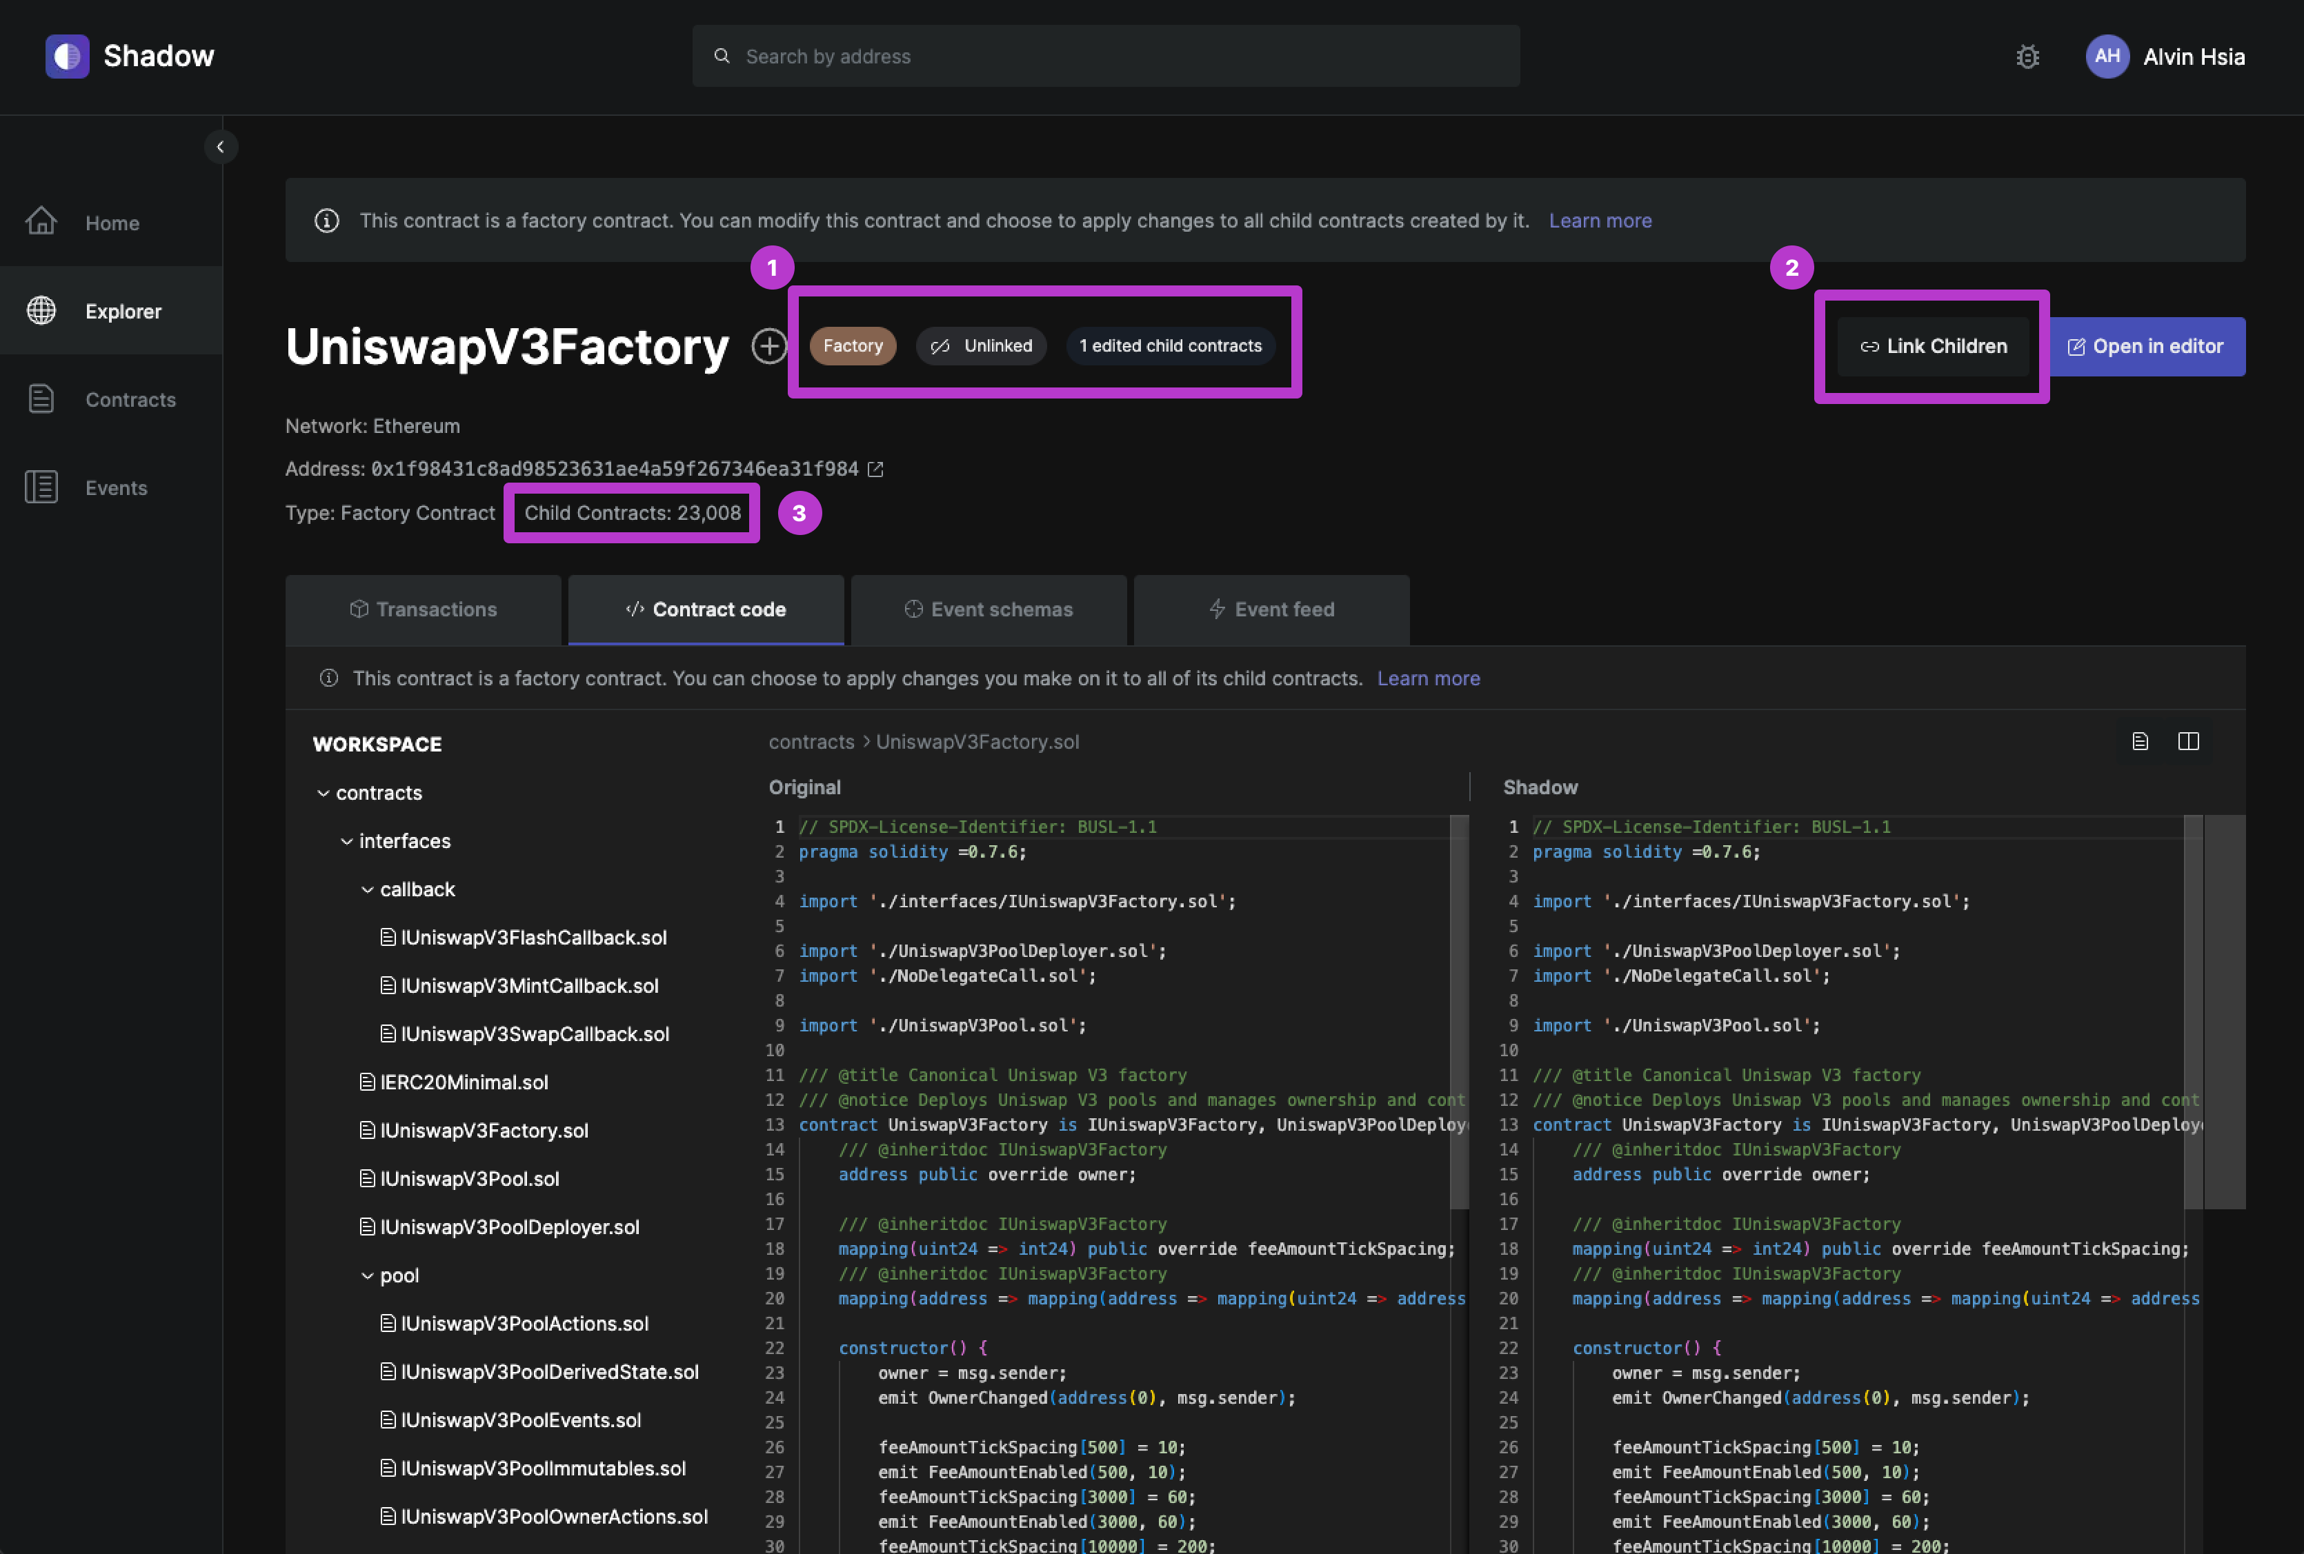
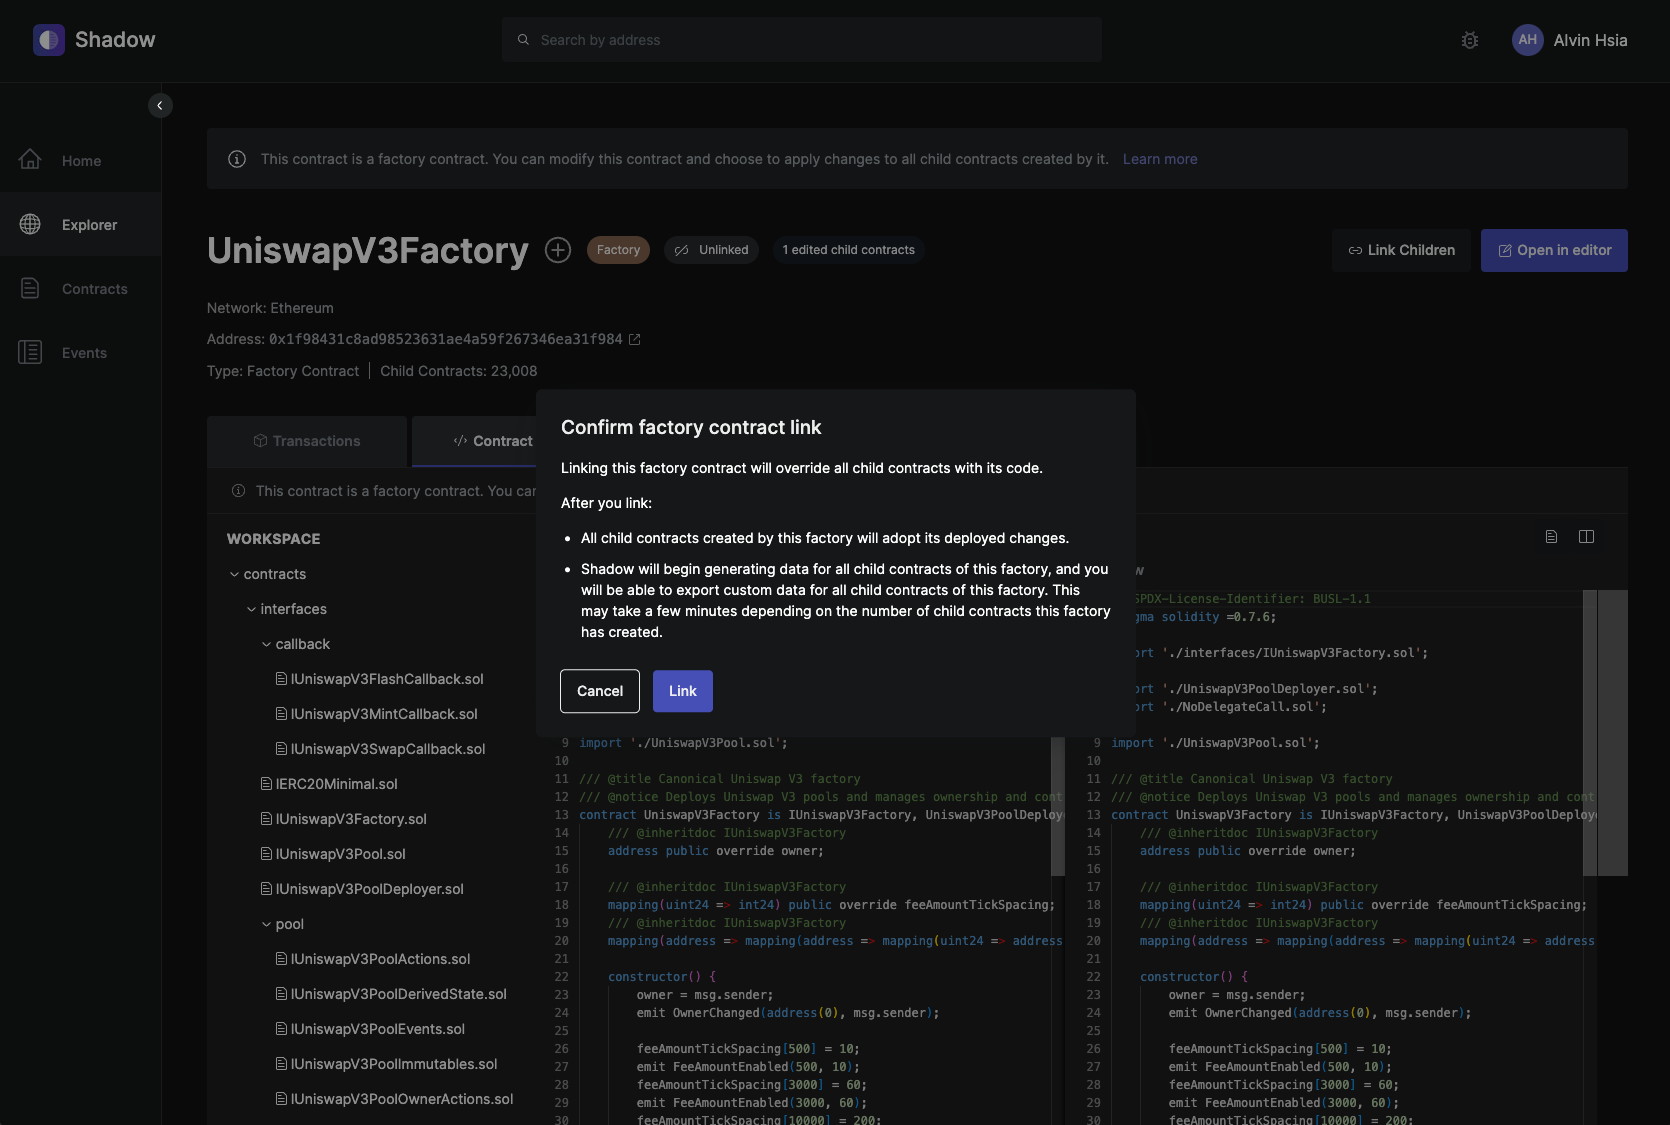
Shadow automatically detects if a contract is a factory contract, or a child contract deployed by a factory contract. On the contract page, you will:
See indicators that tell you:
That this is a factory contract
If the factory contract is current linked with all of its child contracts
The number of separately edited child contracts on your shadow fork
Have the ability to link the changes made on the factory contract with all of its child contracts.
If linked, your changes will apply to all existing children, and any new ones deployed by the factory in the future.
See a total count of all the child contracts deployed by this factory contract
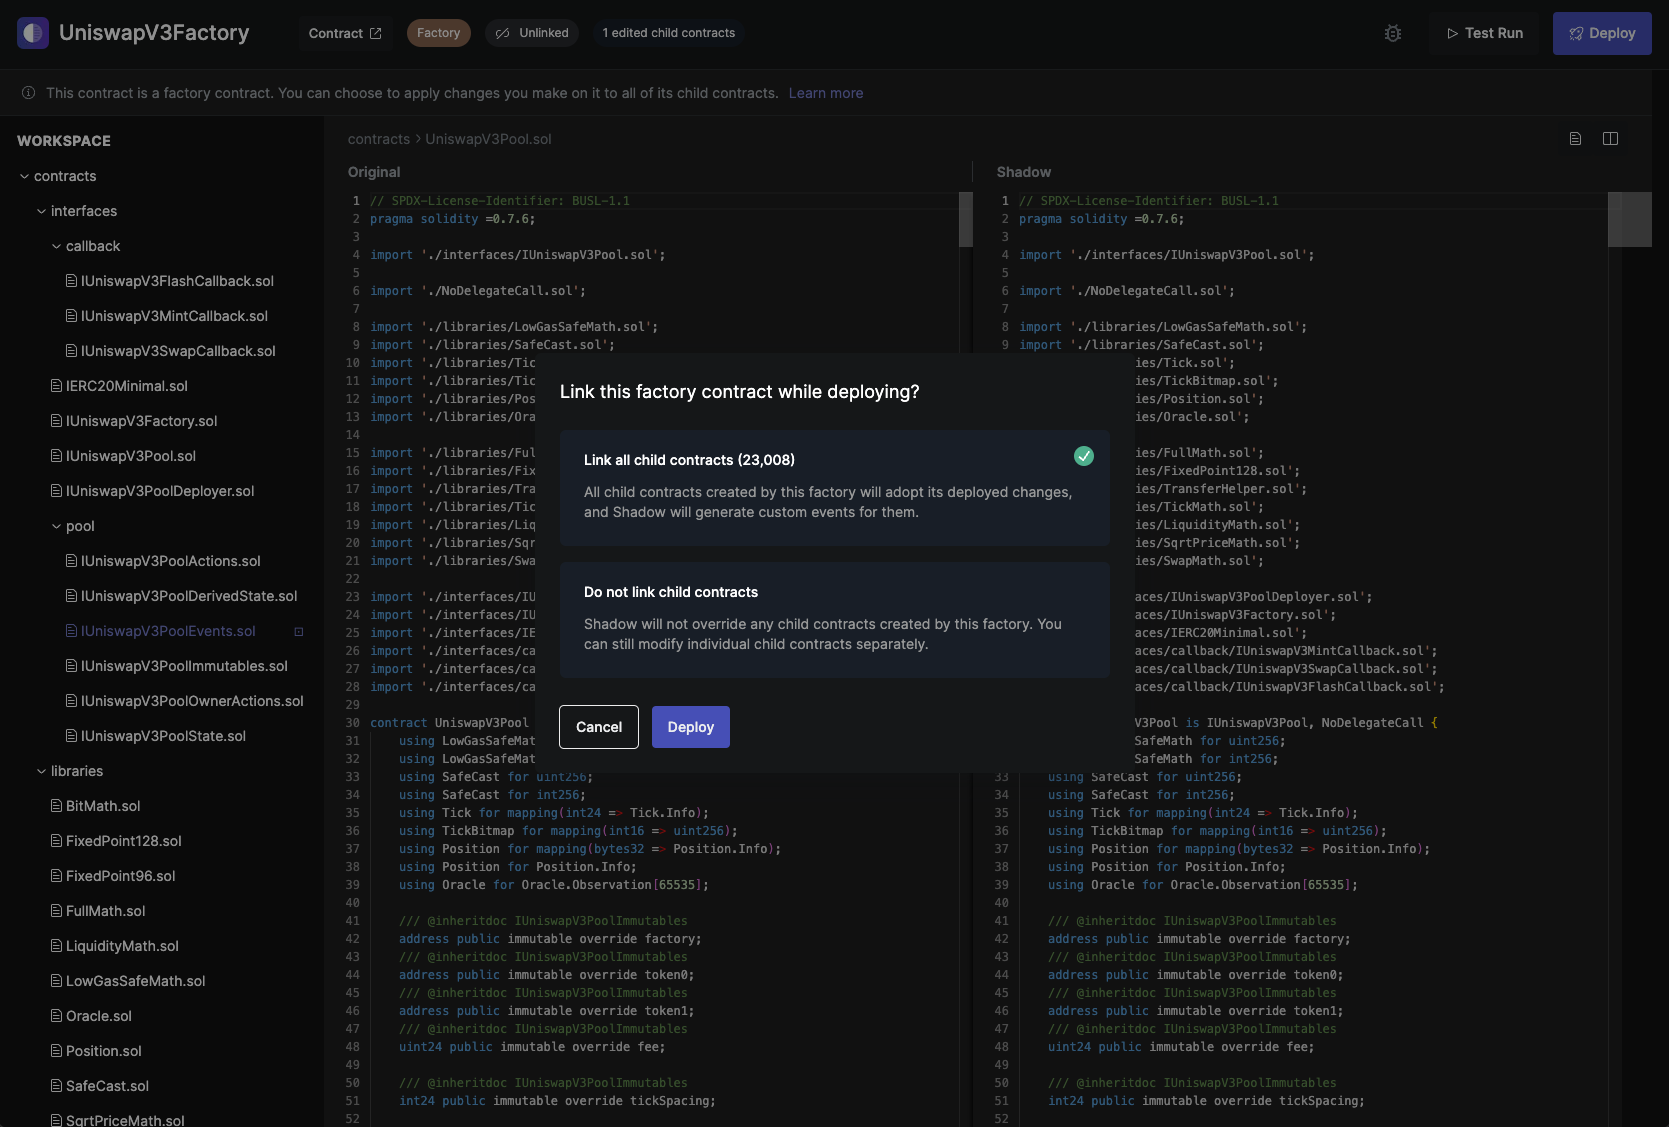
If you already have deployed changes to a factory contracts on your shadow fork, you can simply click the Link Children button from the factory contract page to link it with all of its children.
Once linked, any changes deployed to the factory contract will propagate to its child contracts; this includes all existing child contracts, as well as any child contracts deployed by the factory in the future.
You can also link a factory contract to its child contracts from the Editor, while deploying changes.
Overview
is a platform that reduces the engineering time and costs for advanced onchain data indexing and analytics. Shadow helps you get more data, save users gas, and ship products faster.
Our first product enables you to log anything you want on any smart contract, completely gaslessly.
We've built drop in production-grade infrastructure for that allows you to get custom onchain data with just a few lines of code.
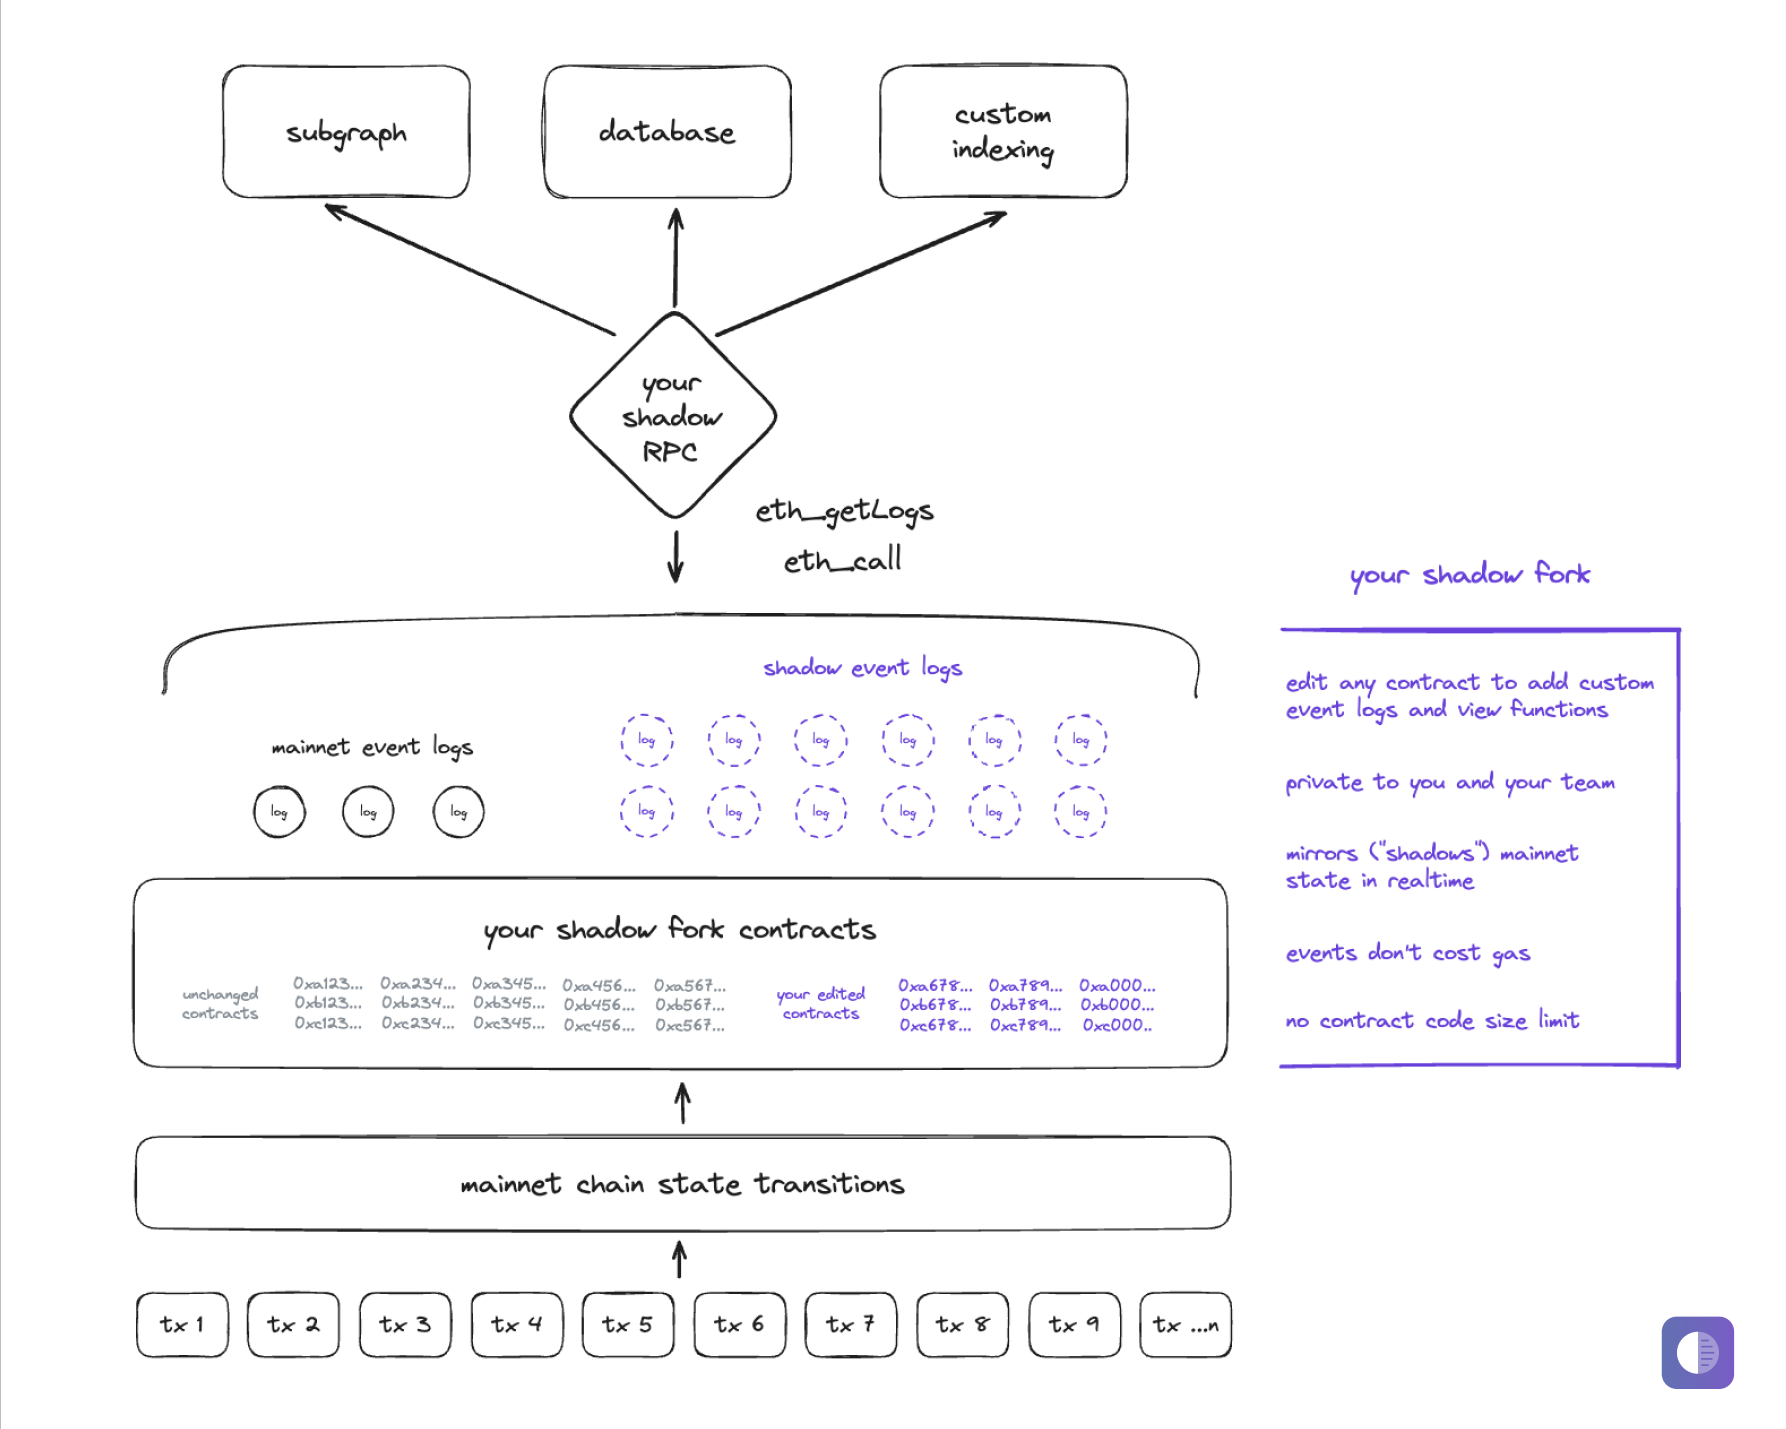
Shadow enables you to modify a deployed contract's source code to add gasless custom event logs and view functions on a that is instrumented to mirror mainnet state in realtime.
Shadow provides you the tools and infrastructure to:
Shadow RPC
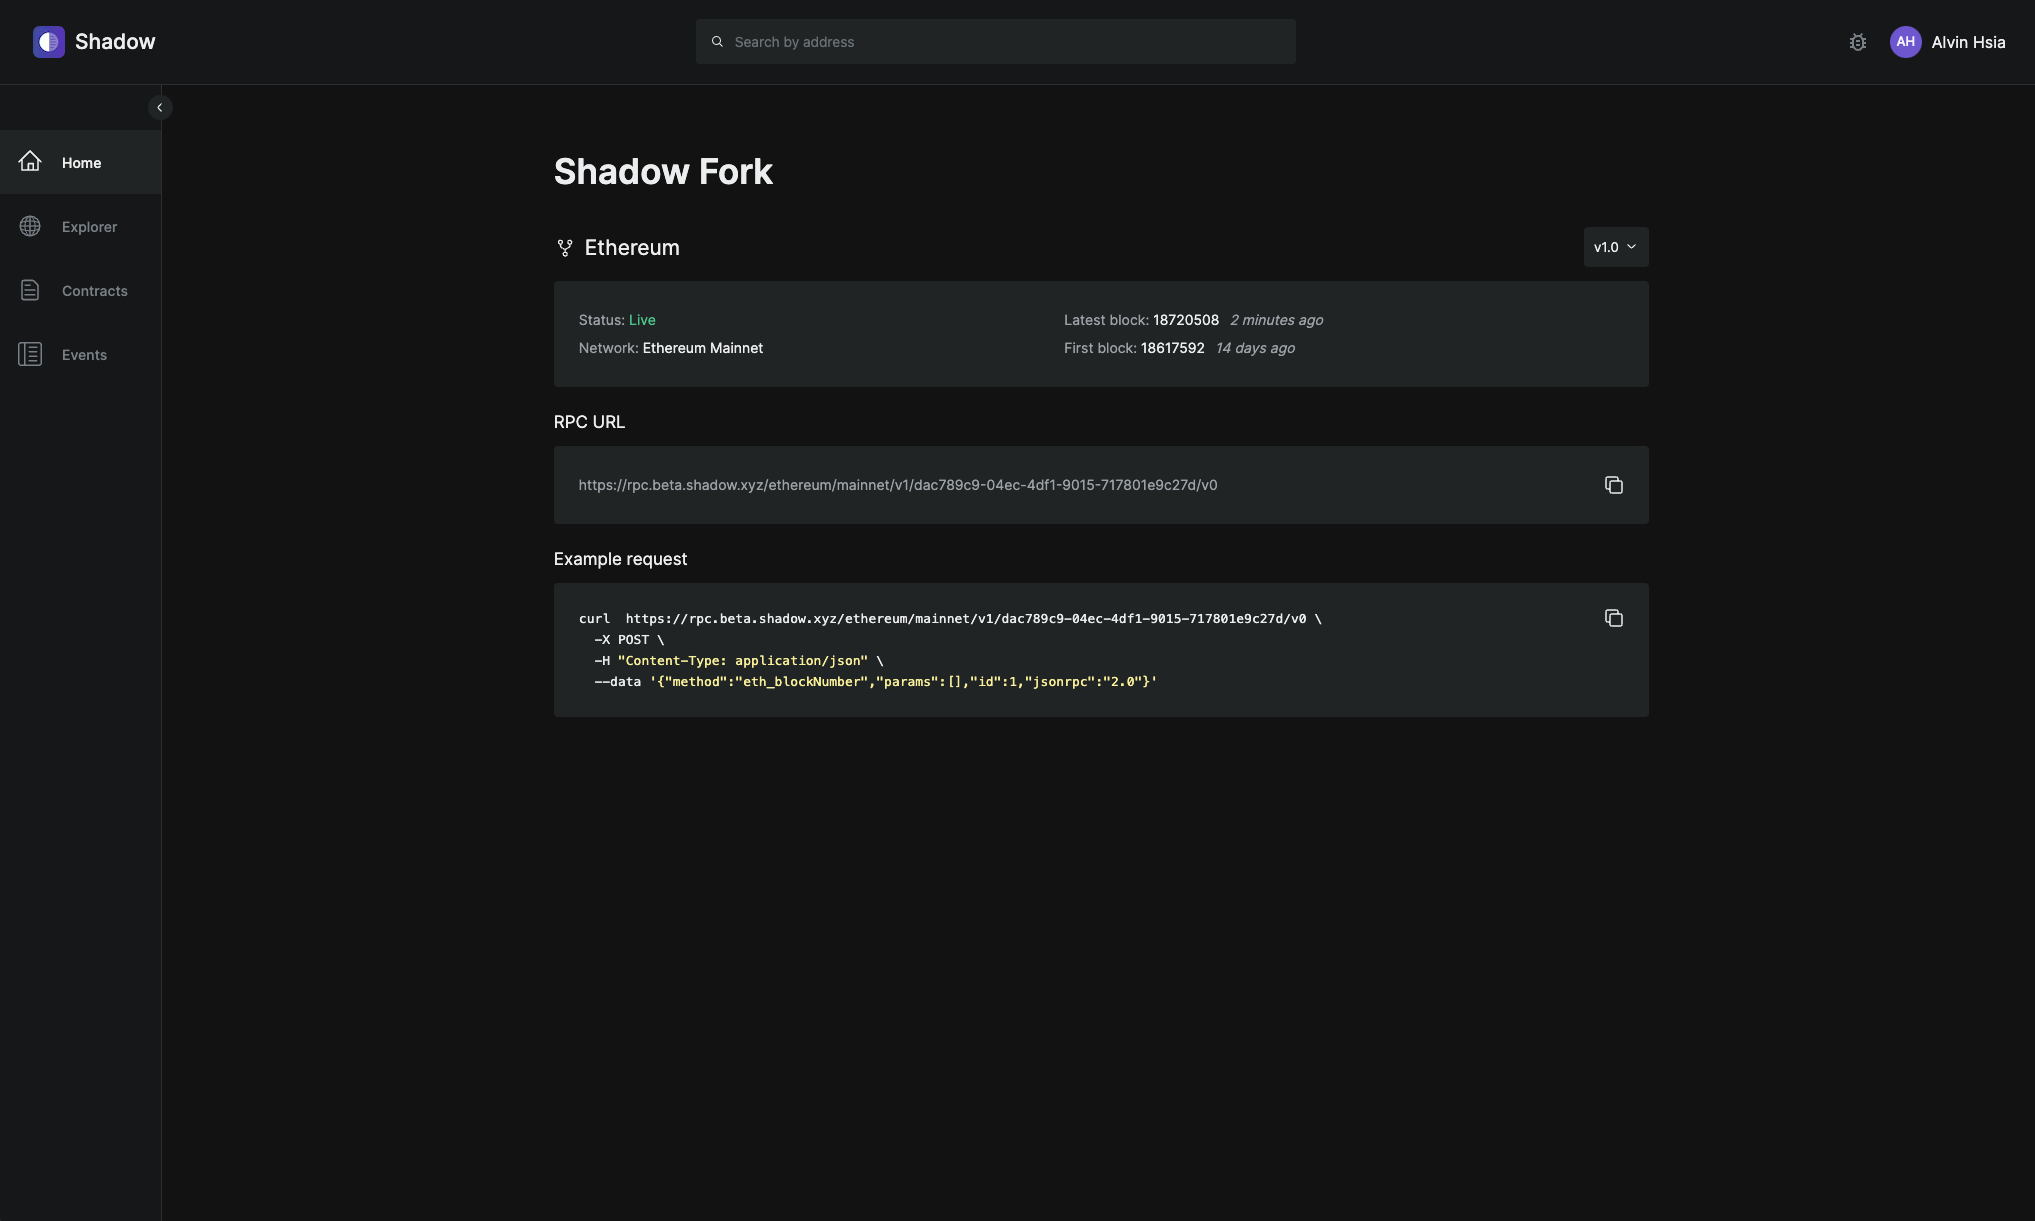
Every shadow fork comes with its own Shadow RPC and a standard set of JSON-RPC endpoints. Shadow RPCs look and feel like a normal RPC, but contains additional shadow data that's custom to your shadow fork.
Each Shadow RPC is versioned, which allows you to safely deploy changes to your shadow fork and test them without disrupting previously running jobs.
Since your Shadow RPC behaves like a normal RPC, you can use it as a drop-in replacement in your own infrastructure (e.g. include shadow events in your custom indexer, or add shadow events to your self-hosted subgraph).
Every request to your Shadow RPC must include the API key in the header of the request. See the page for more details.
Shadow RPCs currently support the following endpoints:
How to's
For a 5 minute guide on how to modify a simple contract, see our .
In this more advanced section, we'll go through how to modify contracts on your shadow fork that use design patterns that are commonly found in the wild:
that delegate call to implementation contracts.
to get token prices in USD, without using offchain price APIs.
Versioning
Your shadow fork has immutable versioning so you can safely deploy changes without disrupting previously running jobs.
Every time you deploy new changes to your shadow fork, a new version will be automatically created with an auto-incrementing version number. This ensures that each version of your shadow fork is immutable, preserving the state and configuration at the time of deployment.
These immutable versions can be reliably used for exports, database syncs, or JSON-RPC calls.
Immutable versioning allows you to safely deploy changes to your shadow fork and test them without disrupting previously running jobs.
For example, if you set up a recurring export on your shadow fork at version v2, that recurring export will always be run using the shadow changes that were deployed at v2.
If you deploy new changes to your shadow fork:
API Keys
Learn how to authenticate your requests to Shadow.
All API requests to Shadow are authenticated via API keys. This includes Shadow RPC requests, as well as api.shadow.xyz endpoints. You can create a new API key by going to your project’s settings page: .
Add your API key to the request header to authorize your Shadow API requests. This header must be included in every request.
X-SHADOW-API-KEY: <YOUR-API-KEY>
For example, this is how you’d authenticate a call to your Shadow RPC:
NFT info (e.g. collection names, onchain attributes)
✅
Ethereum
Sepolia
✅
Base
Mainnet
✅
OP
Mainnet
✅
Arbitrum One
Mainnet
✅
The new shadow fork changes will be deployed at v3
The original recurring export will continue to run at v2
If you want recurring exports at v3, you’ll need to set up a new recurring export at v3
You can cancel the recurring export at v2 at any time
Coming soon: We're working on functionality to roll back changes, allowing you to revert to previous versions if necessary.
eth_call (does not currently support state override set params)
We're working getting to 100% parity for all JSON-RPC endpoints. Don't see one you need? Let us know in our Telegram chat.
As soon as you deploy a shadow contract, your shadow fork RPC will start frontfilling new data within seconds. This means that you can request any data that is generated for new blocks that occur after the point of your shadow contract deployment.
You can also tell Shadow to backfill your shadow fork RPC, which will trigger a background job that populates historical data going back to the genesis block. Once the RPC backfill job is completed, you'll be able to request any historical data for past blocks on your shadow fork.
RPC frontfills are included on free trials and paid .
RPC backfills
RPC backfills are includes on paid .
Linking a factory contract to its child contracts
Demo
Concepts
What is a shadow event?
A shadow event is an event log that only lives in a shadow contract, and not on the version of the contract that is deployed on a public chain. Shadow events are fully customizable, permissionless to write on any contract, don't cost any gas to emit, and can access any internal contract state.
Shadow events are a powerful way to access realtime data for analysis, indexing, and testing purposes, and can significantly reduce the number of data pipelines that you need to maintain.
You can access shadow events via standard methods (e.g. eth_getLogs) using a Shadow RPC, or you can have Shadow automatically decode and index the data for you to export. We currently offer hourly data exports in Parquet to GCP/S3, and are actively working on other export formats.
What is a shadow contract?
When you modify a contract in Shadow to include new shadow events, its bytecode is updated and replaced at the same contract address on your shadow fork. Shadow contracts have the same exact write (e.g. state-changing) functions as their counterparts deployed on the public chain, but can also include additional custom events and view functions that you add.
This means that as your shadow fork executes transactions that occur on the public chain, its state stays in sync, but it also has additional custom data accessible to you.
Unlike their publicly deployed counterparts, shadow contracts don't have any contract size limitations, can be easily updated at any time, and anyone can write their own version of one.
You can compile and deploy shadow contracts in one-click, and Shadow also handles factory created contracts (e.g. only need to deploy once) and proxy contracts for you.
Shadow forks are powerful private execution environments that can be spun up instantly in one click. They're designed to mirror the state of a public blockchain in realtime, but differ in a few important ways that improve data accessibility.
On public blockchains:
Smart contracts are rigid by design and are hard to change once deployed which is great for security, but bad for data accessibility. This presents a lot of data and indexing problems downstream.
Contracts have a 24,576 byte size limit, which often forces developers to choose between functionality and data accessibility.
Generating semantic data (e.g. event logs) costs gas, which are paid by end users. These fees are several orders of magnitude greater than the cost of equivalent operations in a traditional software stack.
On shadow forks:
Smart contracts are flexible and augmenting them is permissionless. Anyone can write a shadow implementation for any contract, at any time.
People who need onchain data can get it precisely for their specific needs on-demand, and everyone else has nothing to worry about.
Gas fees and contract size limits are removed. Projects can optimize their mainnet contracts and reduce gas fees for users by moving event logs and view functions to a shadow contract implementation, and make room for new functionality while significantly improving data accessibility.
A shadow node is a client that makes data on a shadow fork accessible. You can make all of the standard RPC calls to shadow nodes in the same way you do normal nodes – all you need to do is swap out the RPC URL. Shadow hosts and manages shadow nodes for you.
We plan to open source shadow nodes in the future so anyone can run them locally, and have them work with node clients like Reth, Erigon, and Geth.
Proxy contracts
To shadow a contract that is proxied, you’ll need to make shadow changes at the underlying implementation contract address. If the implementation contract changes, you’ll need to shadow the new implementation contract.
A proxy contract is a smart contract that forwards transactions to another implementation contract containing the business logic. The proxy acts as an intermediary, allowing the implementation to be updated without changing the contract address users interact with.
For this example, we will be shadowing USDC to emit a custom event on every transfer. The custom event will be called TransferWithMetadata, and will contain additional metadata about the transfer, including the before and after balances, and the percent change.
USDC follows a proxy pattern with the following addresses:
This will open the playground editor at the implementation contract at (as of Jul 2024).
The bulk of the shadow contract changes lives in the FiatTokenV1.sol file.
At L57, we’ve defined the TransferWithMetadata event and a helper TransferMetadata struct:
Then lower down in the same file, we updated the _transfer function to emit our TransferWithMetadata shadow event:
Click “Compile” > “Test Run” in the top right corner, and paste in this transaction hash –– or you can simulate any other transaction that transferred USDC.
You should see your custom TransferWithMetadata in the output!
If you want to apply these changes on your shadow fork, click the button on the top right corner that says “Apply to your shadow fork”.
This will take you to the editor for your shadow fork, where you can deploy the changes by hitting “Compile > Deploy”.
Events added to an implementation contract are emittedby the proxy contract.
So if you want to see a realtime feed of your shadow events, you'll need to navigate to the proxy contract address .
This means that if you are retrieving data via RPC, you'll need to filter by the proxy contract address.
Similarly, if you are setting up a data export, you'll need to select the proxy contract address.
Recurring exports
Recurring exports are included on paid .
Recurring exports allow you to export data to a destination of your choice on a recurring basis.
Steps
Choose your data: Export shadow and/or mainnet data (coming soon), and specify which contracts and events you want to export.
Choose your destination: Export your data to Dune Analytics, GCS, or S3 (coming soon).
Choose your settings: Specify the starting block you want to export for, the file format (CSV or Parquet), and how to partition the data (daily, hourly, or no partitioning).
Catalog
Overview
Your Shadow Catalog allows you to keep track of the contracts and events that you're interested in.
Contract Catalog
To add a contract to your Catalog, click the + icon next to the contract name. You can add any contract to your Catalog, even if you haven't made any edits to the original deployed version.
Adding or removing a contract to your Catalog has no bearing on the modifications you may have made on that contract; it's just a way for you to keep track of things in the web app. Your shadow fork will continue to execute transactions on the version of the contract that was last deployed.
Adding a contract to your Catalog
Once you've added a contract to your Catalog, you'll be able to see it in your Contract Catalog tab.
Contract Catalog page
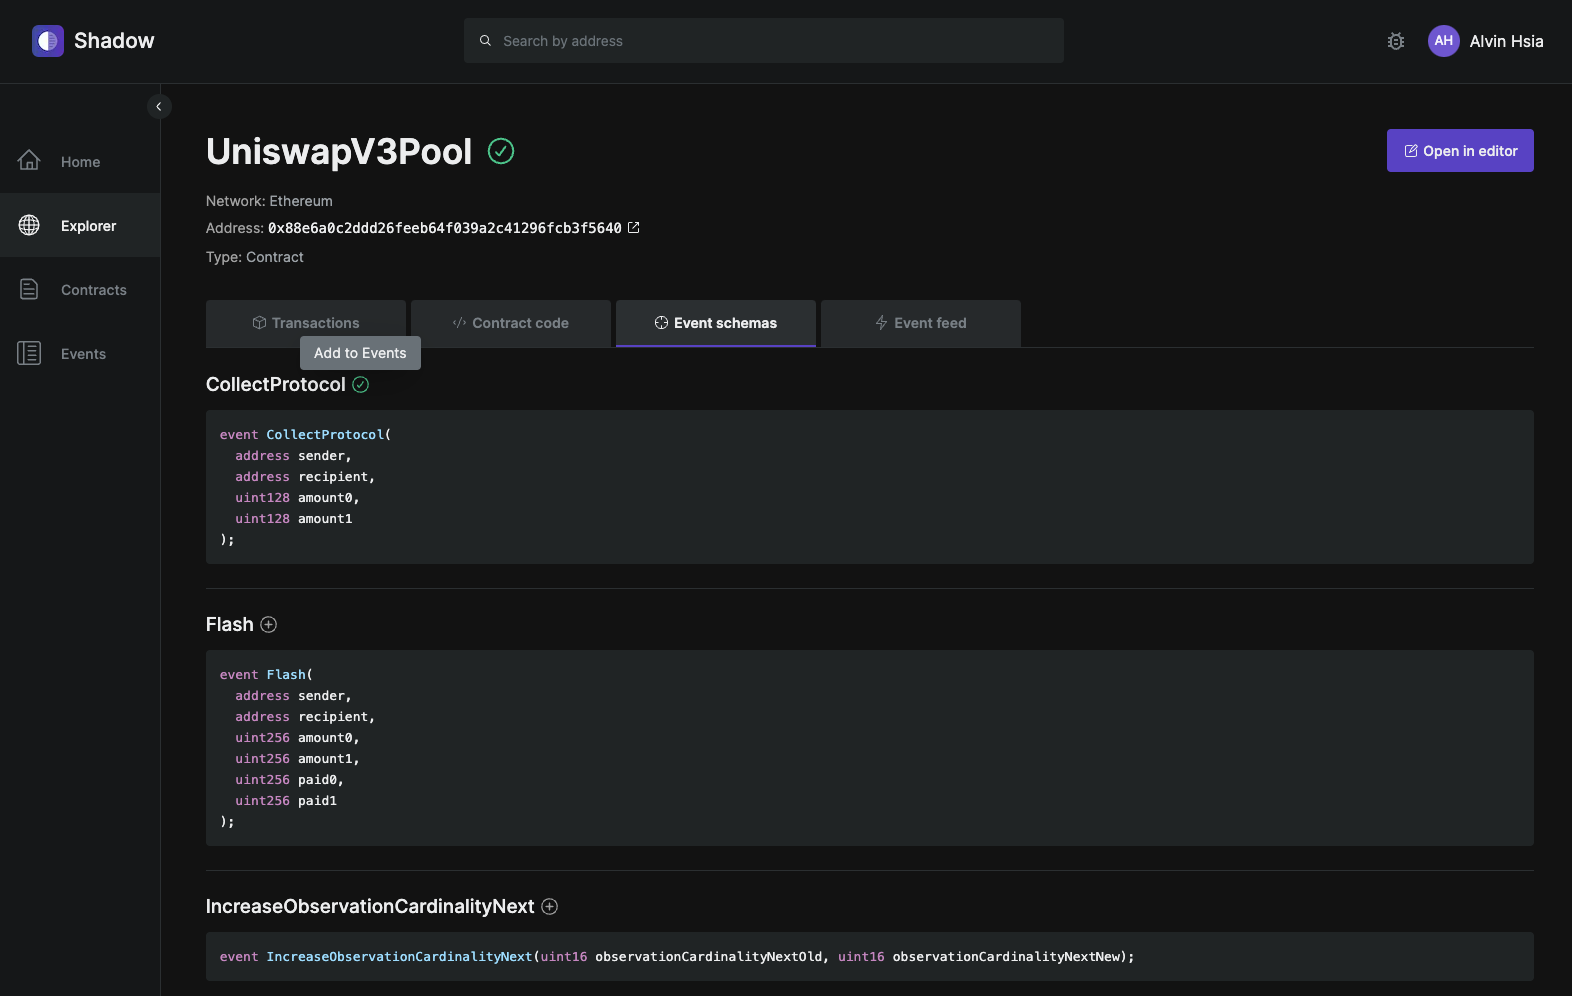
Event Catalog
To add an event to your Catalog, click the + icon next to the event name in the Event Schemas tab of a contract page. You can add any event to your Catalog, even if it's not a custom shadow event.
Adding or removing an event to your Catalog has no bearing on the modifications you may have made to the event; it's just a way for you to keep track of things in the web app. Your shadow fork will continue to execute transactions on the version of the event that was last deployed.
Database syncs
Database syncs are included on paid .
Database syncs allow you to stream data to your own database in realtime.
Data will appear within seconds of a transaction on mainnet landing, and Shadow handles re-orgs for you automatically by replacing rows.
Steps
Choose your data: Export shadow and/or mainnet data (coming soon), and specify which contracts and events you want to export.
Choose your destination: You can send your data to your own Postgres database.
Choose your settings: You’ll be prompted to set a start block for the recurring export if you’d like to export historical data.
GCS / S3
Set up a fully managed data pipeline to export data to a GCS / S3 bucket in a one-off or recurring fashion.
The GCS / S3 integration is included on paid .
The GCS / S3 integration is available for One-off Exports and Recurring Exports. It's ideal for teams who need historical blockchain data for analytics or research use cases that don’t require real-time data freshness. Data exports to GCS / S3 offer the highest flexibility, allowing you to upload data into tools that you already use such as Snowflake, Metabase, etc.
When you set up a data export to GCS / S3, you’ll be able to specify:
Which contracts and events to export
The file format (CSV or Parquet)
How often you want the data delivered to your bucket (daily, hourly, every 15 min)
How to partition the data (daily, hourly, or no partitioning)
See the or pages for additional information.
Dune
Set up a fully managed data pipeline to upload data to Dune in a one-off or recurring fashion.
The Dune integration is included on paid .
The Dune integration is available for one-off exports and recurring exports. It's ideal for teams who want to make their shadow events accessible to the community, or for teams who primarily use Dune as a tool for data analysis.
When you set up a data export to Dune, you’ll be able to specify:
Which contracts and events to export
How often to upload the data to Dune (daily, hourly, every 15 min)
You’ll also need to provide a Dune API key, which you can create on Dune following these . Make sure that your Dune plan allows you to upload the amount of data required for your data export.
See the or pages for additional information.
Test runs
Shadow's test run feature allows you to preview shadow events for confirmed transactions, before actually deploying changes to your shadow fork.
This makes it easier to:
Iterate on your shadow contract changes
Verify that you're getting the data you expect
Inspect particularly complex transactions
Open editor mode for a contract and make changes
Compile your shadow contract
Click "test run" and paste in a transaction hash
One-off exports
One-off exports are included on paid .
One-off exports allow you to export data to a destination of your choice for a specified block range.
Steps
Choose your data: Export shadow and/or mainnet data (coming soon), and specify which contracts and events you want to export.
Choose your destination: Export your data to Dune, GCS, or S3 (coming soon).
Choose your settings: Specify the block range you want to export over, the file format (CSV or Parquet), and how to partition the data (daily, hourly, or no partitioning).
Interdependent shadow contracts
You can make interdependent shadow contract changes across multiple contracts by editing and deploying each contract separately.
In this example, we’ll be making interdependent changes to Blur’s Blend and BlurPool contracts.
We’ll be making changes so that the BlurPool contract will emit a new shadow event TransferForLien every time some ETH in the pool gets transferred due to an action taken on a given lien (e.g. borrow, repay, refinance). The TransferForLien shadow event will include metadata about the lien.
In BlurPool.sol on L115, we’ve introduced a new function called transferFromForLien:
You can see the schema of the TransferForLien event in the IBlurPool.sol file:
If you want to apply these changes on your shadow fork, click the button on the top right corner that says “Apply to your shadow fork”. This will take you to the editor for your shadow fork, where you can deploy the changes by hitting “Compile > Deploy”.
Go to the following URL to open the Blend contract in the Shadow Playground for this example.:
In Blend.sol, you’ll see that we updated all BlurPool.transferFrom() call sites to call the new transferFromForLien function we added earlier.
Click “Compile” > “Test Run” in the top right corner, and paste in the following transaction hashes to see these shadow changes in action:
Borrow:
Repay:
Refinance:
You should see your custom TransferForLien event in the output for each transaction!
If you want to apply these changes on your shadow fork, click the button on the top right corner that says “Apply to your shadow fork”.
This will take you to the editor for your shadow fork, where you can deploy the changes by hitting “Compile > Deploy”.
Proxy contracts
A proxy contract in Ethereum is a smart contract that acts as an intermediary or wrapper for another contract, enabling features like upgradeability and interaction redirection.
Proxy contracts make delegate calls to a designated implementation contract, which contains the actual smart contract logic. This setup allows the logic (implementation contract) to be updated without changing the proxy contract's address, preserving the contract's state and address on the blockchain. Proxy contracts are a core component in creating upgradeable smart contracts.
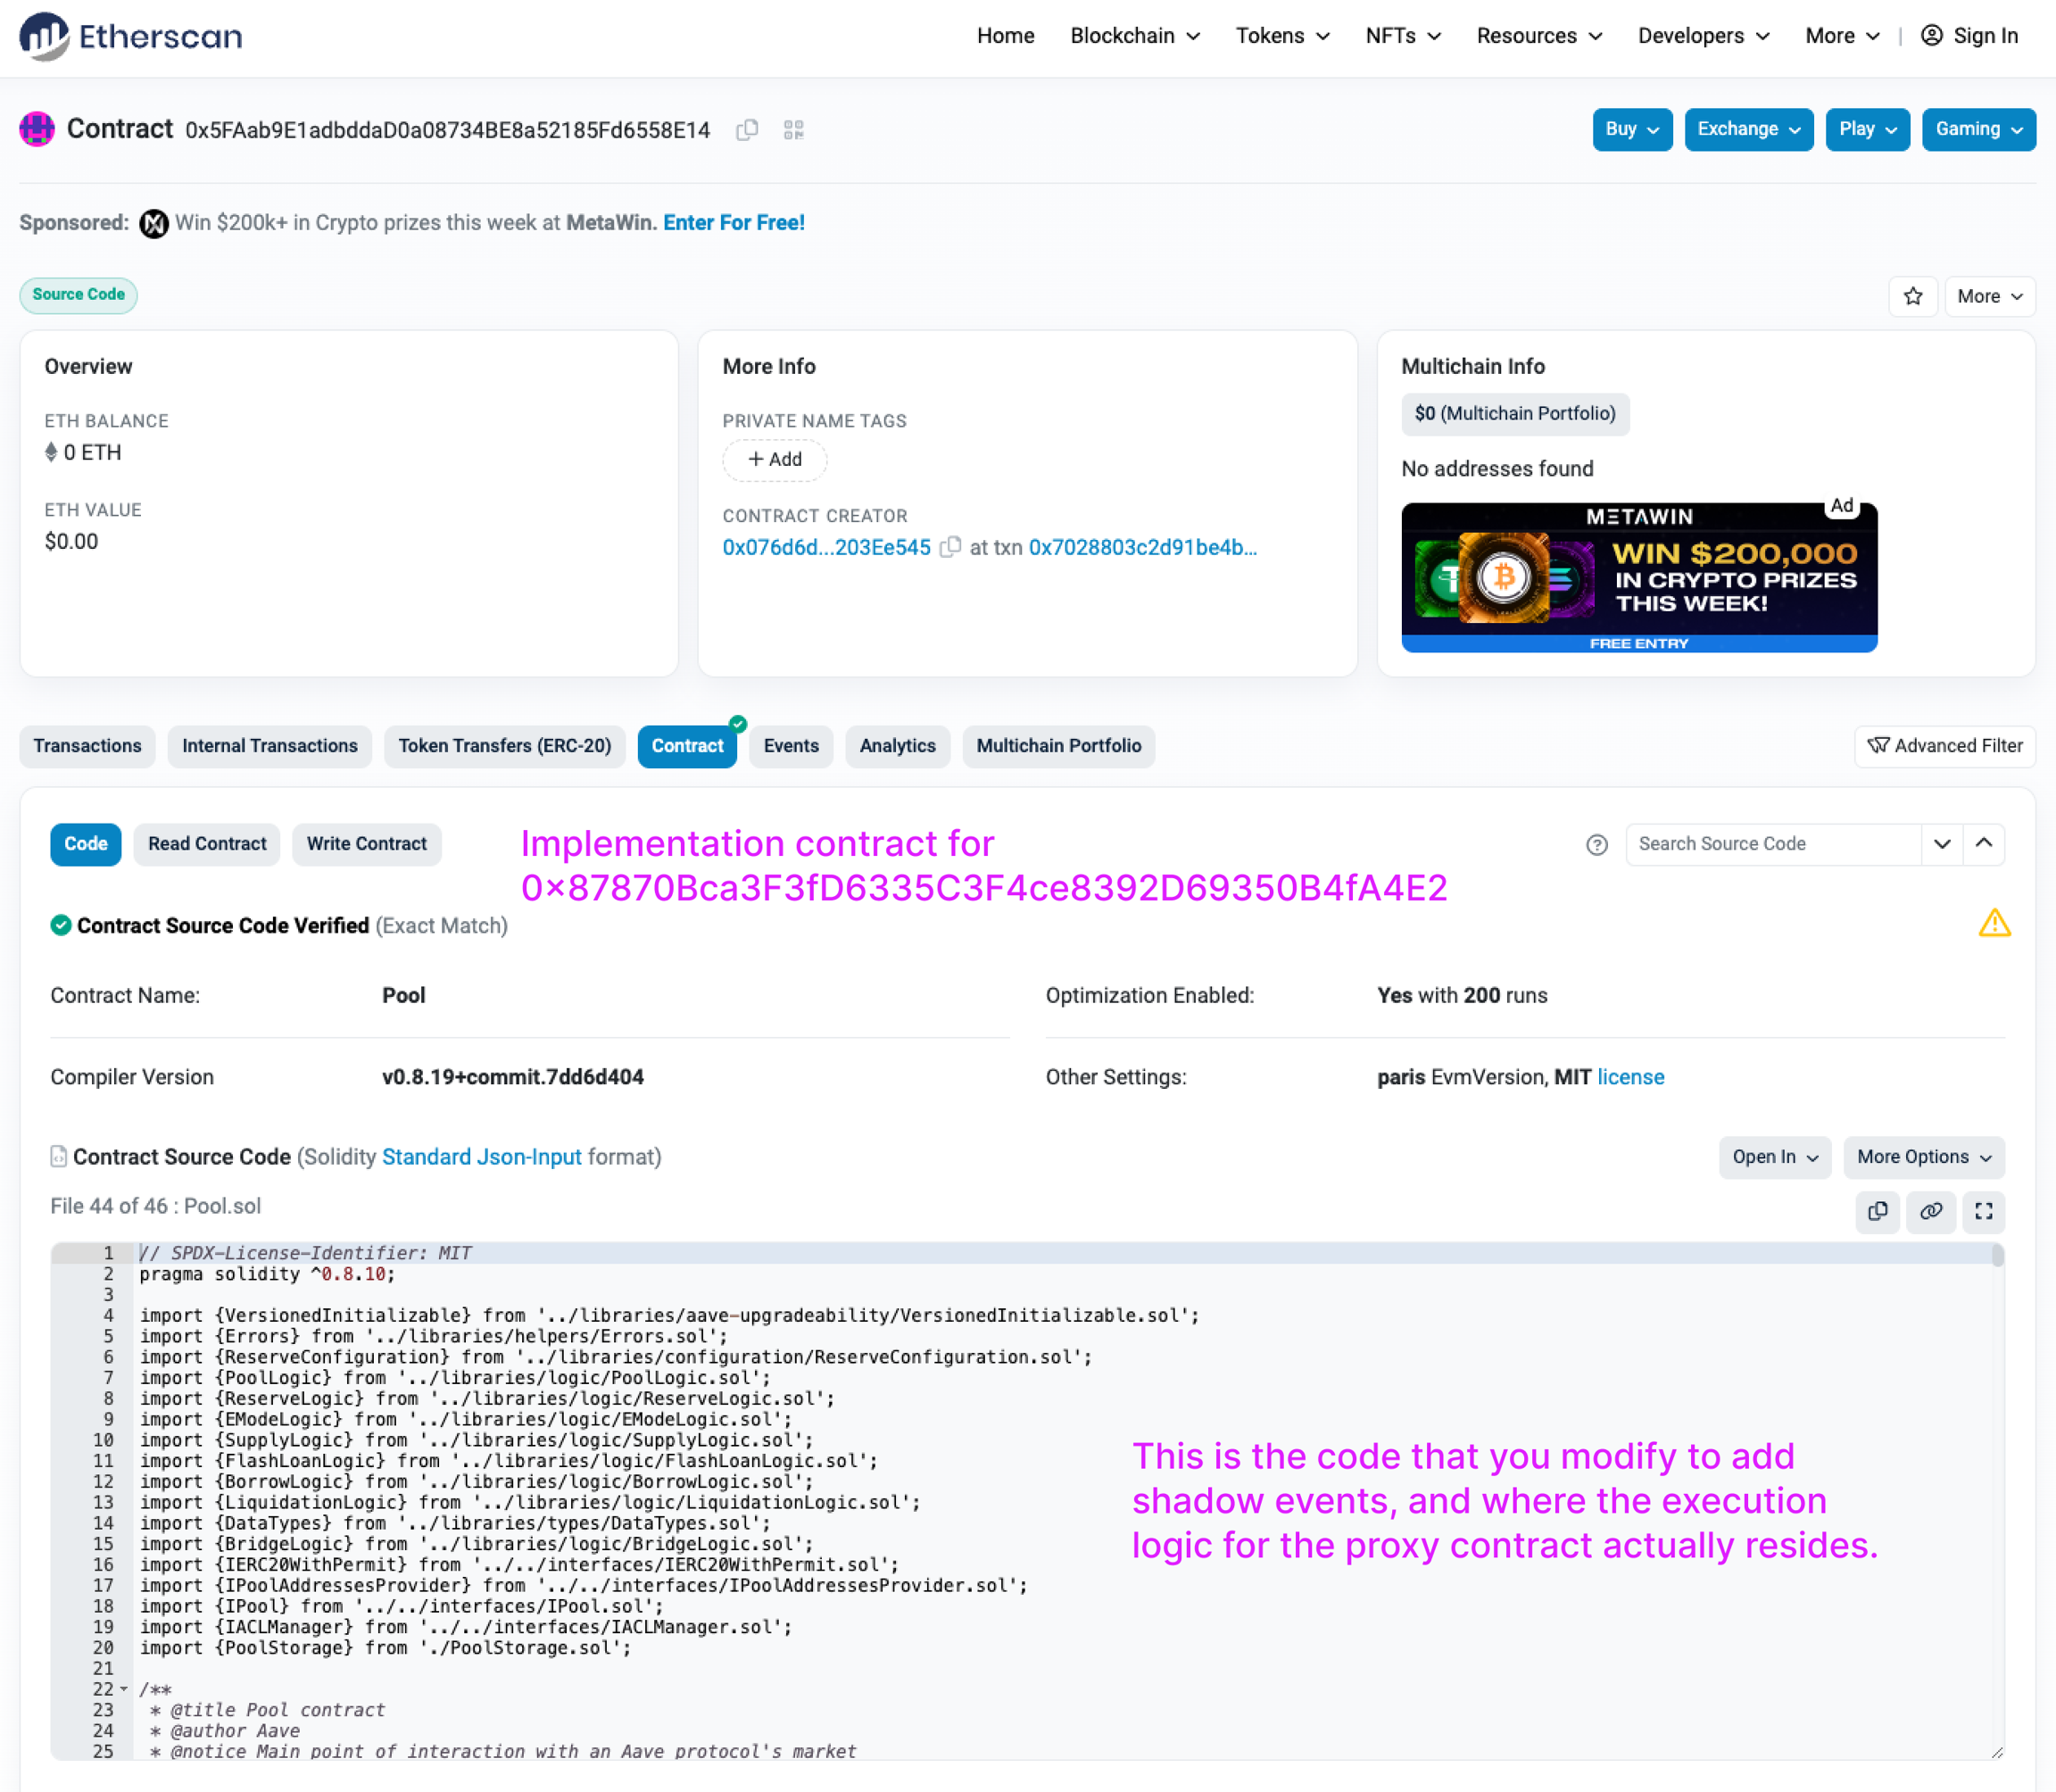
If you want to get custom data for a contract that uses a proxy pattern, you'll need to modify the code of the implementation contract, because that's where the actual contract logic resides.
When transactions happen, events will get emitted by the proxy contract, while the event declarations and event emit logic reside in the code of the implementation contract. This is the same way other platforms that index smart contract data handle proxy patterns.
You will want to add both the proxy contract and implementation contract to your , because you will need to:
Subgraphs
Shadow RPCs support the read methods required by most subgraph services.
You can run a local subgraph pointed to a Shadow RPC today, and we're actively working on integrations with hosted subgraph providers.
You can significantly reduce the time to resync your subgraph by moving pieces of indexing logic into custom shadow events. For example, if your subgraph currently:
Uses bindings to call contract view functions for state data
FAQs
Start with our step-by-step guide for detailed instructions with screenshots to get set up.
Shadow is currently production ready for Ethereum Mainnet, as well as Arbitrum Mainnet with limited functionality. We plan to support Optimism and Base Mainnets by August 2024. If there are additional chains you need supported, please reach out to us at gm@shadow.xyz.
Forking functionality offered by other developer tools, such as Tenderly or Anvil, are more useful for one-off simulations to test a sequence of transactions that you need to specify. Shadow is more useful for continuously simulating what is actually happening on mainnet, and generating additional data based on mainnet transactions. Tenderly forks do not continuously execute (i.e. “shadow”) mainnet transactions, and also does not support event backfills.
Your Shadow fork will fully execute and index shadow events a few seconds after a transaction is confirmed on mainnet (P95 <5s). This is fast enough to satisfy most realtime use cases. If you need even faster performance, please reach out to us so we can better understand your specific use case.
No – the general idea behind Shadow is to really only "control" the contract and EVM read path by overriding contracts. For example, it's not currently designed to allow you to arbitrarily top up balances, or send one-off transactions. It's designed such that your Shadow fork can be an extension of mainnet, with essentially the same state, but emit a lot more data that you are able to fully define and can easily use.
Using oracles
Without Shadow, augmenting blockchain data with point-in-time accurate prices requires complex data pipelines and integrations with third-party price feed APIs. Shadow drastically simplifies this by allowing you to leverage existing oracle contracts, in <100 lines of code.
In this example, we’ll be updating the 1inch Aggregator contract to emit a shadow event called OrderFilledDetails that contains additional metadata of a trade, including the point-in-time USD price of the trade. We’ll be fetching the point-in-time prices via a Chainlink oracle.
Open the example on the Shadow Playground:
This will open the playground editor at the 1inch Aggregation Router v5 contract on Ethereum at (as of Jul 2024).
At L4302, we’ve defined the OrderFilledDetails event and a helper OrderDetails struct:
Postgres
Set up a fully managed data pipeline to stream data into your Postgres database in real-time.
The Postgres integration is available for . It's ideal for teams who need real-time, reorg-aware, data for indexing or analytics.
With data streamed directly into your Postgres instance, you can build REST or GraphQL APIs tailored to your specific use cases. This eliminates the overhead required of managing real-time data pipelines, allowing you to focus on core application development.
To set up a database sync, you’ll need to provide:
Host address
If you choose to export shadow data, you’ll only be able to select events from contract addresses that you have shadowed (e.g. deployed modifications to).
If you shadowed the implementation of a proxy contract, you’ll need to perform a “no-op deploy” on the proxy contract by hitting “Compile > Deploy” in the editor without making any shadow changes. We’re working on a better experience for this!
Yes – you need to be at least somewhat comfortable with Solidity. Shadow is designed for Solidity developers, or analysts who are familiar enough with Solidity to read contract code and add event log code. You won’t need to write complete Solidity smart contracts in Shadow, but you need to be able to write snippets of Solidity code to add custom shadow events. We know that many onchain analysts are most familiar with SQL, and we’re investigating ways to make it easy for folks with very little Solidity experience to use Shadow effectively. See our guide for Solidity Beginners.
Yes – you can move all of your events off of mainnet and onto Shadow. Based on our research, this would result in users saving between ~4-12% in gas costs. Keep in mind, this is not strictly necessary in order to use Shadow – you can leave your mainnet events as-is and simply add new events on Shadow.
Shadow accesses and stores public blockchain data, or data that can be derived from public blockchain data. This includes: wallet addresses, wallet transactions, contract events, and contract storage slots. Otherwise, Shadow does not collect or store any personal identifiable information (PII) on your users. For example, we do not collect or store IP address, name, email address, locale, or any other sensitive user information.
Are you a beginner to Solidity?
What chains does Shadow support?
How is Shadow different than other forks? (e.g. Tenderly?)
How far behind the chain tip are Shadow forks?
Can I arbitrarily set state or send a test transaction on Shadow forks?
If you're happy with the data results, deploy the contract
Steps
Edit the logic and add shadow events to the implementation contract
View the event emits on the proxy contract
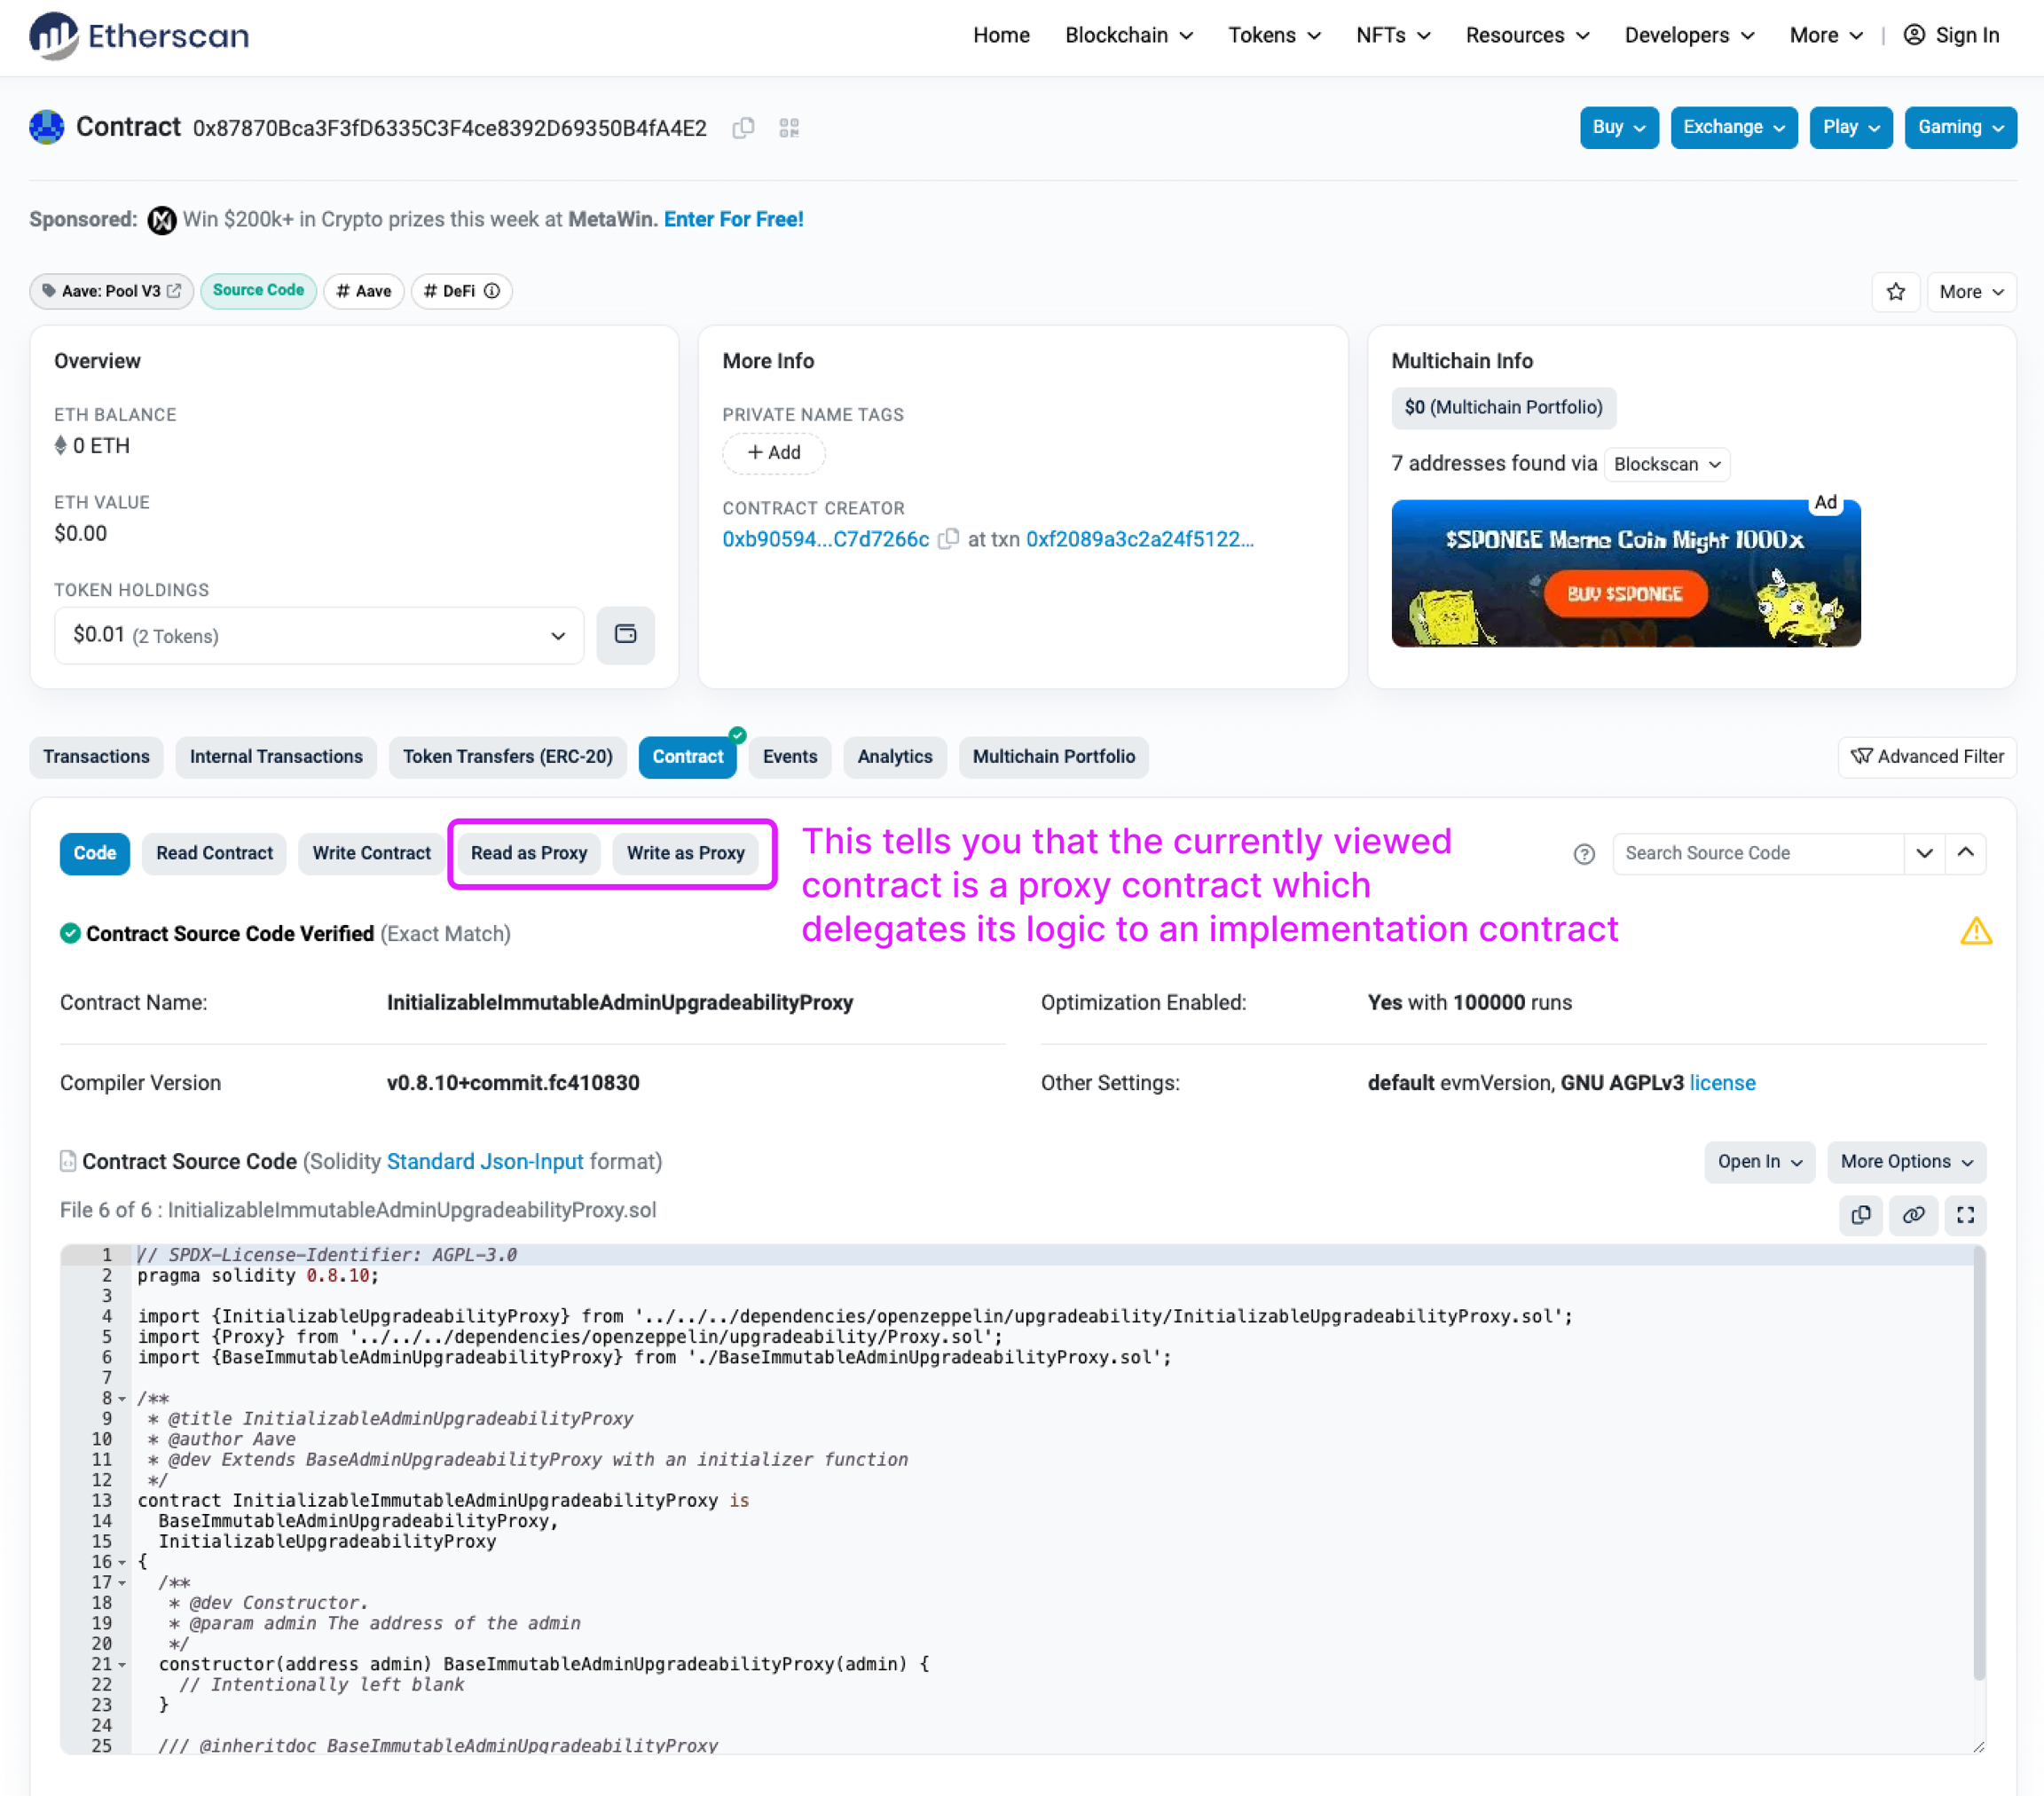
On the Etherscan contract page, click on the Contract subtab. If you see the Read as Proxy tab, that means that this contract is a proxy contract.
Here's the Aave V3 Pool contract, which uses a proxy pattern, as an example.
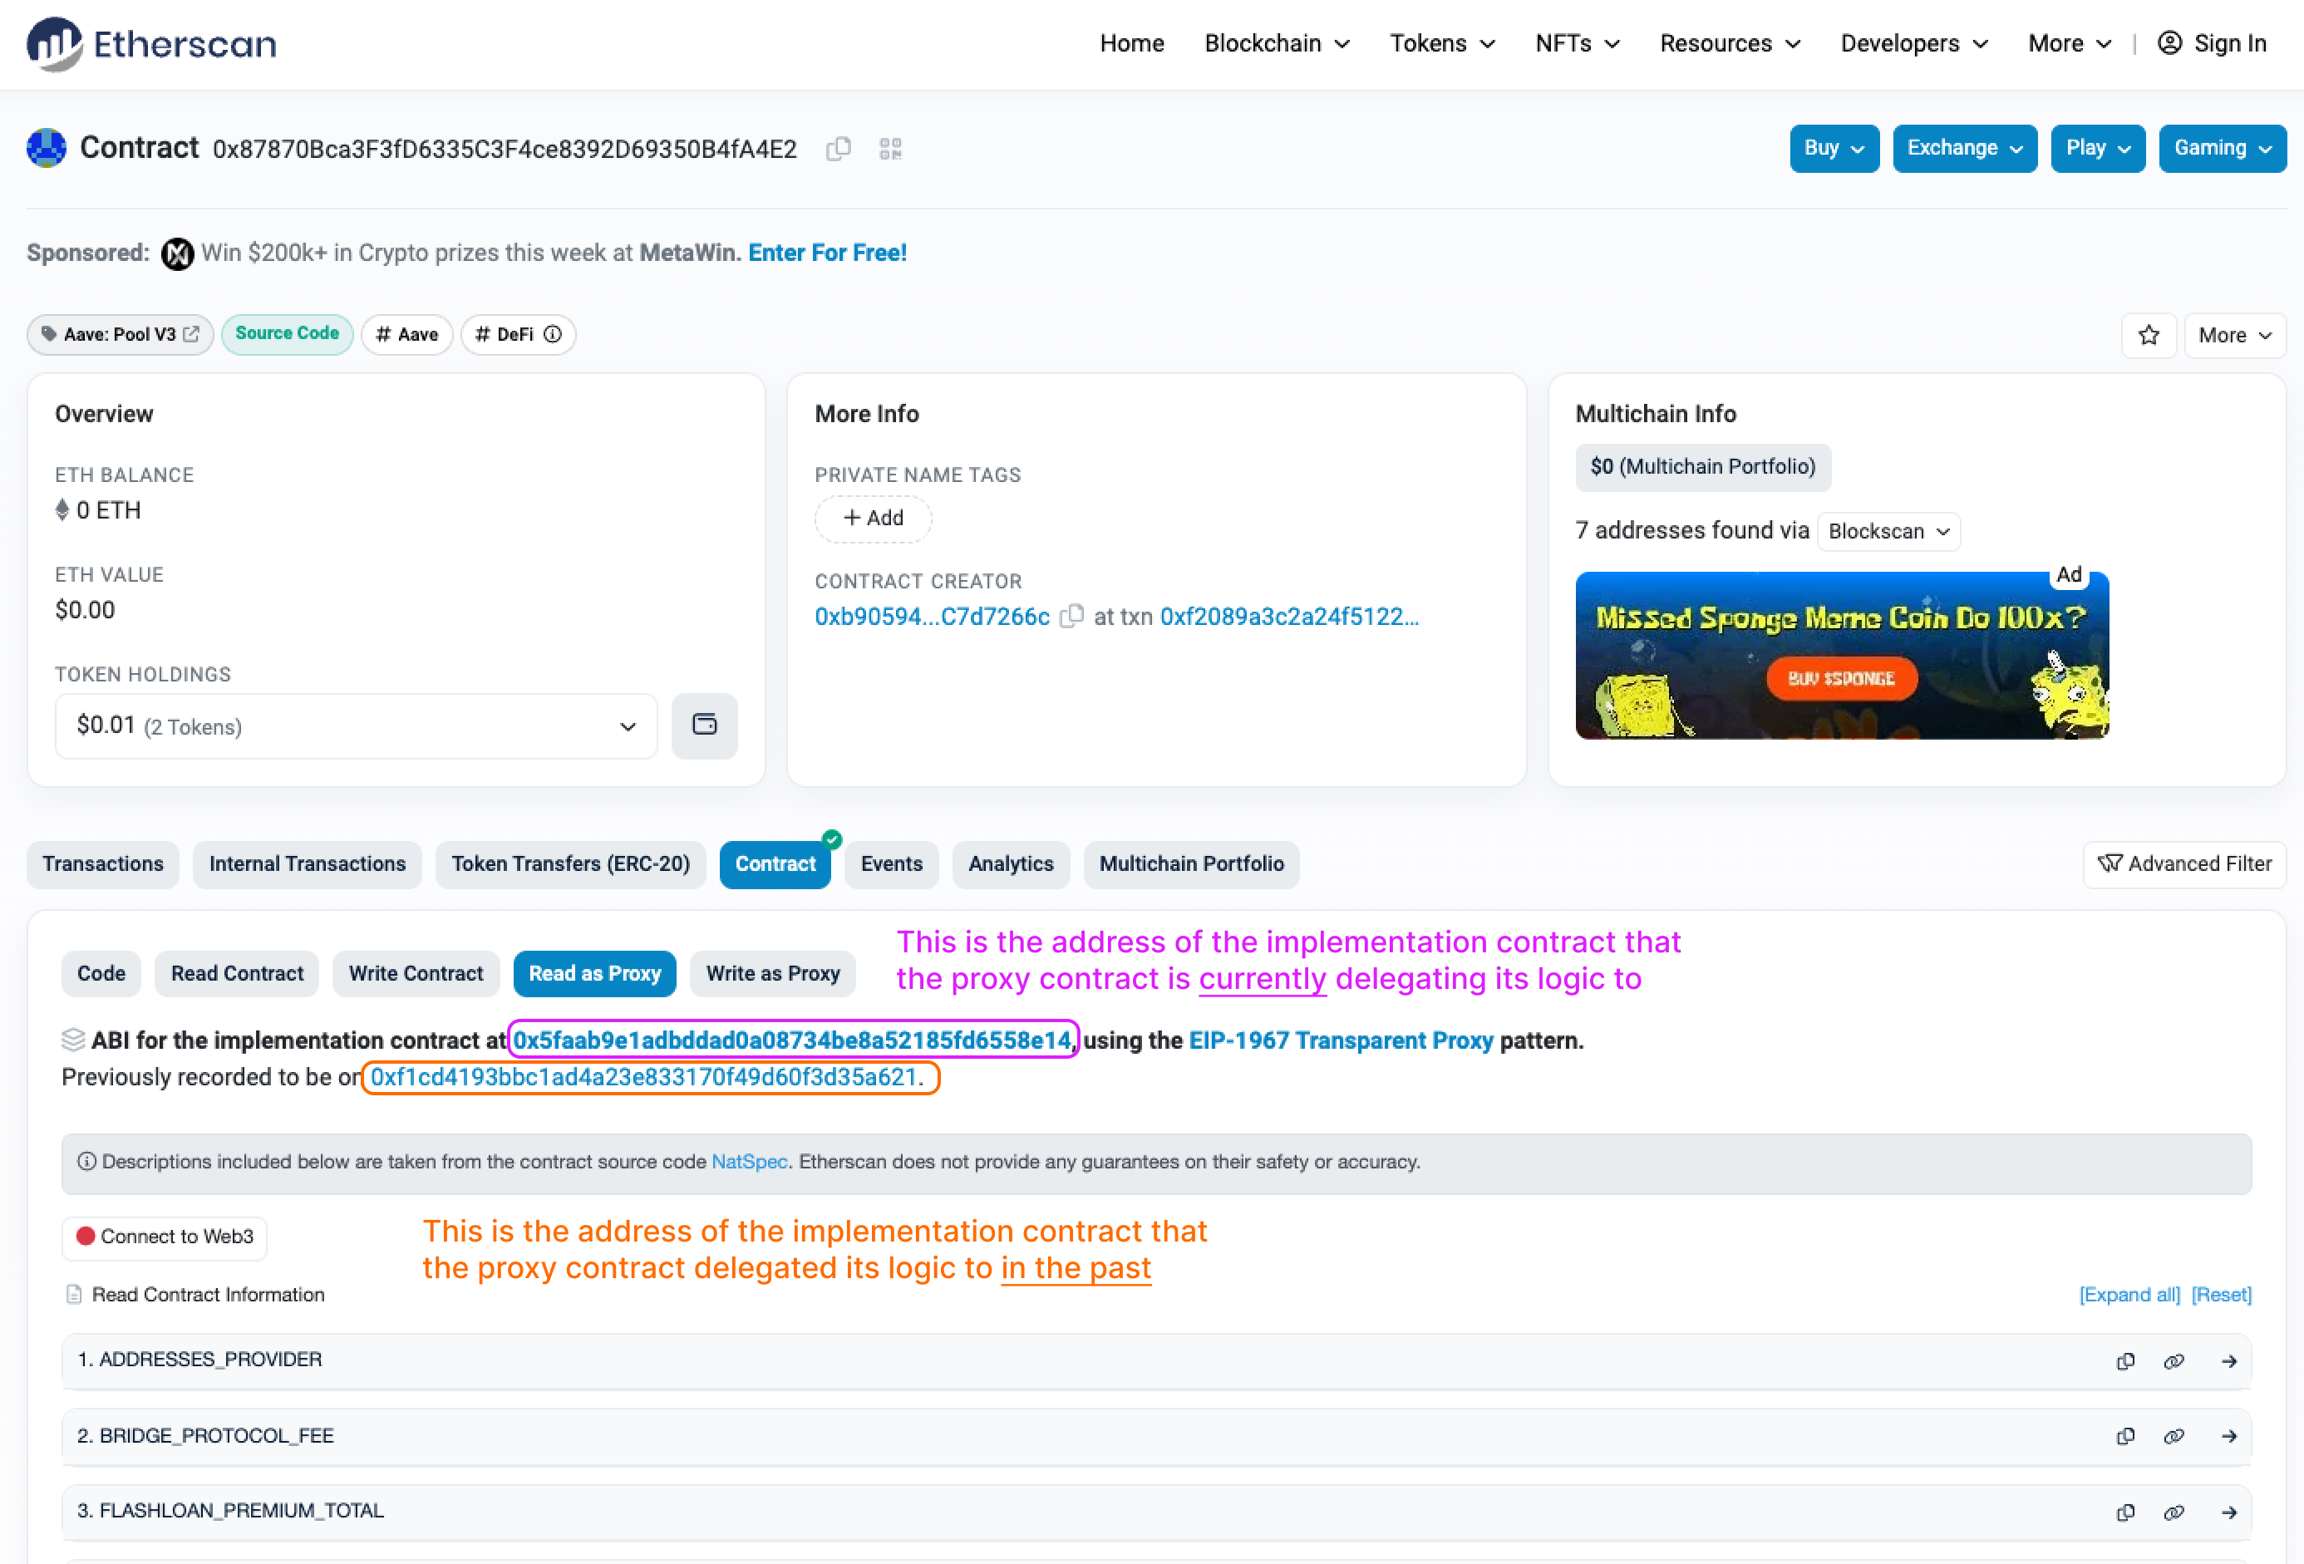
Click on the Read as Proxy subtab. The current implementation contract address will be listed.
If you want to get shadow event data across a time period where the proxy contract has changed the implementation contract that it delegates its logic to, you will need to write separate shadow event logic on each implementation contract that was used during that time period.
This is because the logic across the previous implementation contracts could be different. Shadow will show your custom data from all implementation contracts on the proxy contract.
How do I find a proxy contract's implementation contract?
What do I do if a proxy has multiple past implementation contracts?
Uses any callHandlers
Recreates contract logic in AssemblyScript to arrive at required values
Then you'll be able to make your subgraph sync much faster with Shadow.
Instead of making slow and expensive RPC calls, relying on function tracing, or writing complex logic in AssemblyScript, you can move everything into simple eventHandlers with custom shadow events.
Our team can pair with you to evaluate potential subgraph performance improvements. If you're interested in getting direct support from our engineering team on this, please email fast@shadow.xyz.
Step-by-step instructions on setting up a local graph node pointed to your Shadow RPC.
Spin up a local graph node instance; requirements:
Migrate your shadow contracts to a local solidity project where you can compile the base contract as well as generate respective ABI bindings (e.g. Foundry, Hardhat)
subgraph project using your local shadow contract instead of pointing to an Etherscan explorer
Verify that your subgraph.yaml :
Points to the appropriate local contract dependencies (i.e, abi.json, source path)
Contains the shadow events in the eventHandlers mapping
Create and deploy your local subgraph to your local node; e.g:
graph create --node SUBGRAPH_NAME
graph deploy SUBGRAPH_NAME --ipfs --node
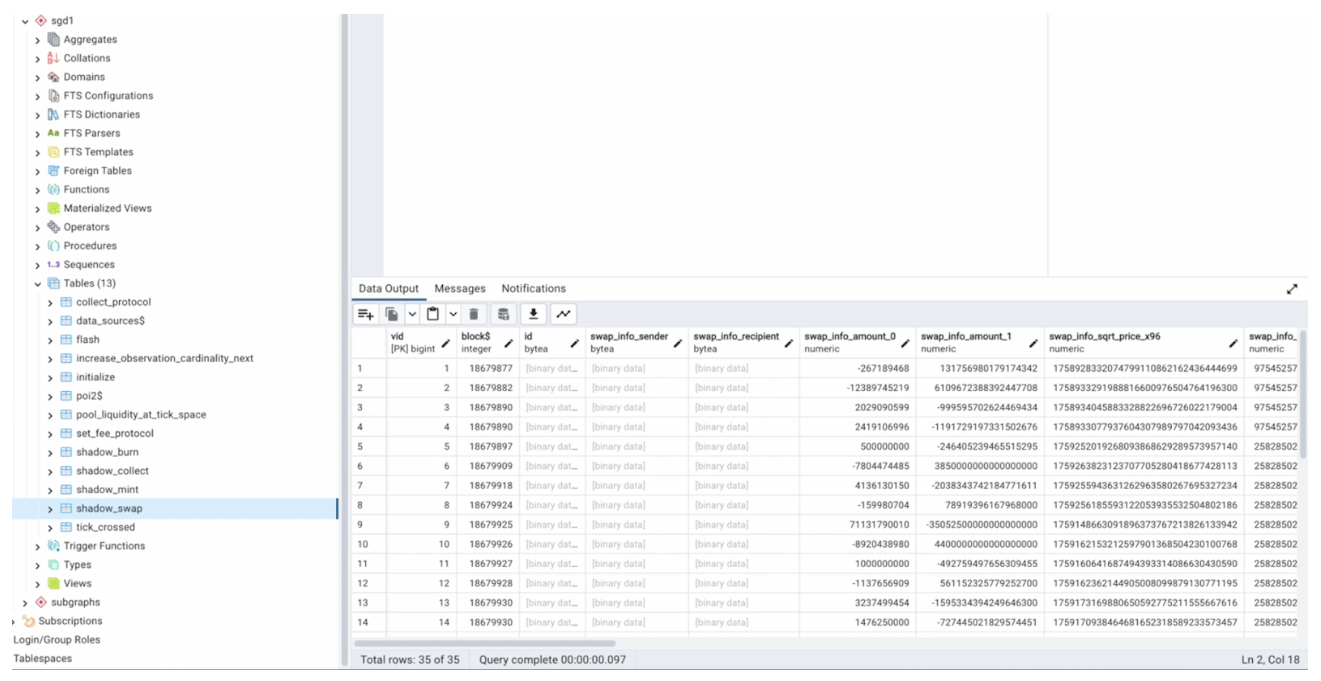
Verify that your shadow logs are being indexed by verifying your postgres db. There should be sgd* database schema with unique tables per each contract event id. (e.g, sgd0/transfer)
Why use Shadow with subgraphs?
Moving indexing logic into Solidity also makes your subgraph more end-to-end testable, reducing the engineering time for releasing new features and debugging indexing problems.
Integrations
Local Graph Node
Configure your local node to use your Shadow RPC URL as a provider for your desired chain and include your Shadow API key as part of the provider details by using the `X-SHADOW-API-KEY` custom header.
For more info, see The Graph's documentation on .
At L4567, we call a new function called getOrderAmountUsd and emit the OrderFilledDetails event:
At the bottom of the contract at L4667, we define the getOrderAmountUsd function and two other helper functions:
Notice that we also pasted Chainlink’s AggregatorV3Interface into this file. This allows us to call the Chainlink oracle contract via its interface. You’ll have to do this any time you introduce shadow changes that interact with a contract interface that it doesn’t currently interact with.
If you choose to export shadow data, you’ll only be able to select events from contract addresses that you have shadowed (e.g. deployed modifications to).
If you shadowed the implementation of a proxy contract, you’ll need to perform a “no-op deploy” on the proxy contract by hitting “Compile > Deploy” in the editor without making any shadow changes. We’re working on a better experience for this!
Cursor AI prompt to give GPT context on Shadow and provide ready-to-use code
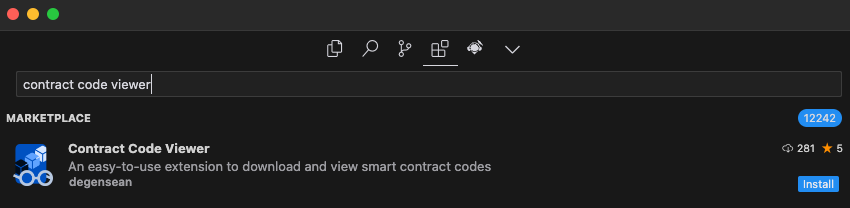
Contract Code Viewer extension to pull down contract code by pasting in an Etherscan link
to compile your shadow contracts
This guide shows you how to set each of these tools up and use them effectively.
is a GPT-4 integrated IDE built on top of VSCode. Using this is highly recommended for beginners to Solidity or non-engineers (e.g. data analysts), as it has a number of benefits:
It has full codebase context of all files in a smart contract without needing to copy paste
It can write code for you directly in the contract
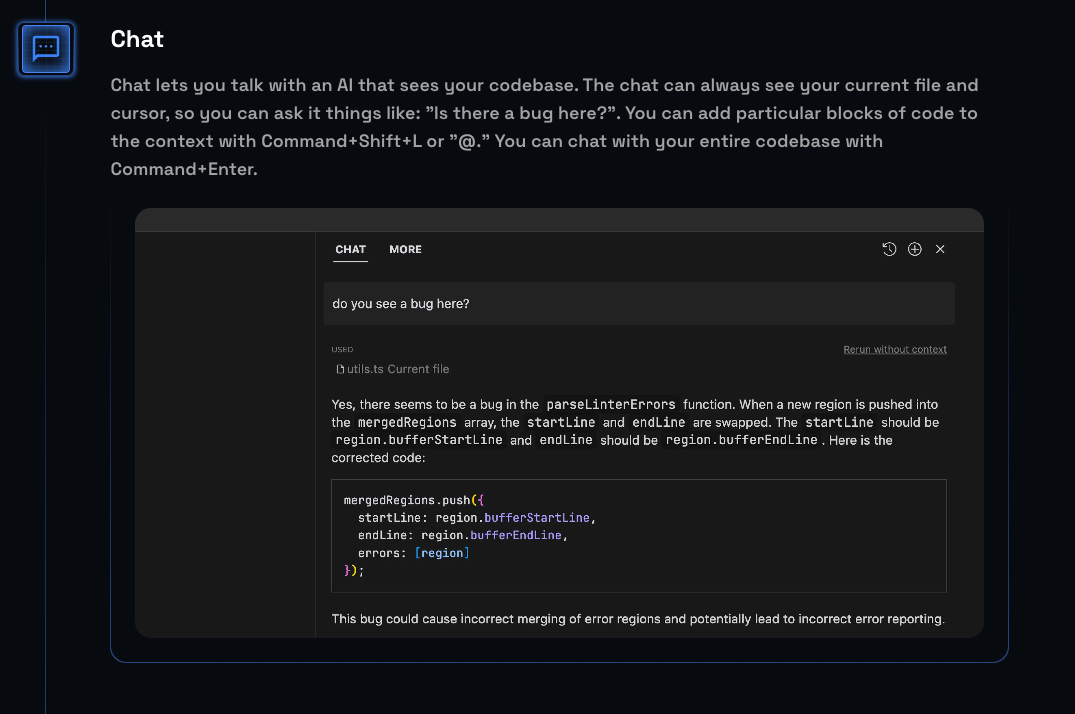
You can easily link to a code snippet when asking the AI questions
Cursor's standard subscription costs the same as ChatGPT Plus ($20/mo). You can also provide a GPT API key and pay no extra costs (hit the gear icon in the top right corner).
This is a GPT prompt that we've iterated on through trial and error. It gives GPT context about what Shadow is, and guidelines for how to answer your questions and write shadow events for you. Paste this into Cursor to give the AI rules on how to answer your questions and write code.
The Contract Code Viewer extension allows you to download contract code into Cursor simply by pasting in an Etherscan link. This will allow you to edit the contract to add shadow events.
How to install within Cursor:
Navigate to the extensions tab within Cursor in the top left corner
Search "Contract Code Viewer" → select the extension by degensean → Install
How to use within Cursor:
Click into the top search bar in Cursor and type > to open the command palette, or use the keyboard shortcut cmd + shift + p and type "contract code viewer"
Select Enter URL to the contract on explorer
Paste in the Etherscan URL of the contract that you want to add shadow events to
Open the folder or file that shows up on the dialog
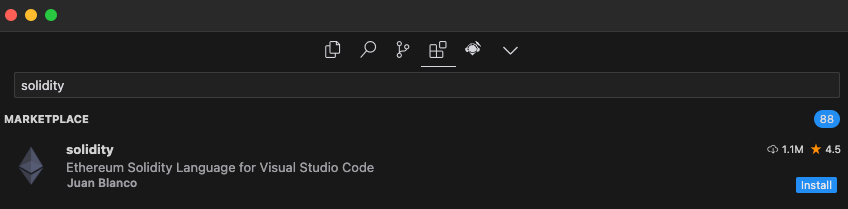
The Solidity VSCode extension by Juan Blanco is what most Solidity developers use. This will allow you to compile your Solidity contracts for testing and prettifies Solidity code for easier reading.
How to install within Cursor:
Navigate to the extensions tab within Cursor in the top left corner
Search "Solidity" → select the Solidity VSCode extension by Juan Blanco → Install
How to use within Cursor:
Compiling contracts means that you are compiling your Solidity code into bytecode, which is the low-level language that the EVM uses. This is a necessary step to ensure that your Solidity code can be processed into valid bytecode that is readable by the EVM (and Shadow).
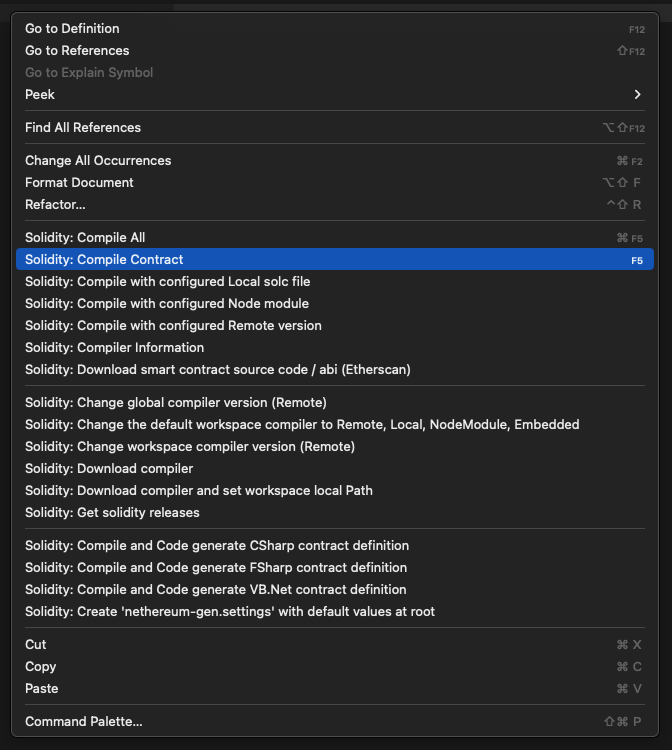
What to do: Within a contract file (.sol), right click anywhere and select Compile contract or use the keyboard shortcut F5
Changing the compiler version is necessary to successfully compile the specific contract that you are modifying. The extension will default to the latest Solidity compiler version, but oftentimes you will be modifying a contract that was deployed using a previous compiler version.
What to do:
Click into the top search bar in Cursor and type > to open the command palette, or use the keyboard shortcut cmd + shift + p and type "change compiler"
Solidity beginners
Don't know Solidity? Don't worry.
Using Shadow does require some Solidity knowledge, but you don't need to be an expert.
At a high-level, you need to be able to:
Decide what you want your end shadow event data table to look like
Read smart contracts well enough to understand where to insert shadow events
You can one click ask it to resolve compiler errors
Select
Change workspace compiler version (Remote)
Change version to match what's written in pragma solidity = at the top of the contract
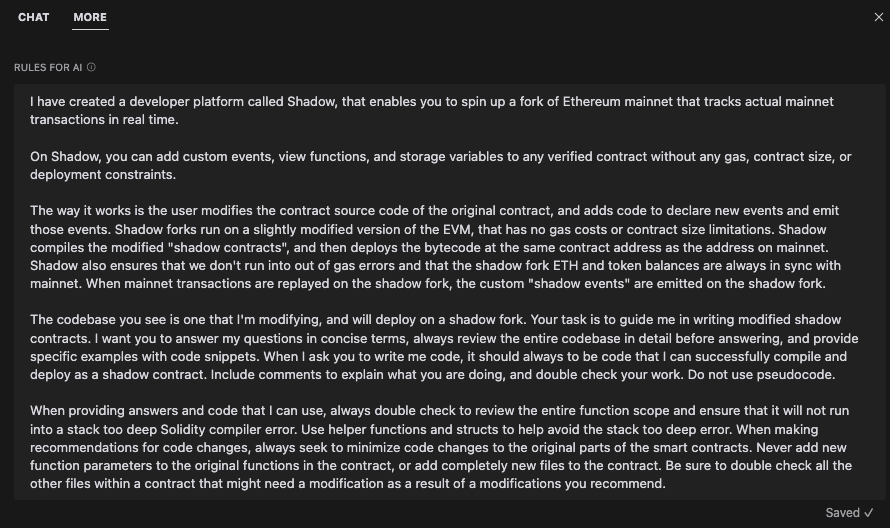
I have created a developer platform called Shadow, that enables you to spin up a fork of Ethereum mainnet that tracks actual mainnet transactions in real time.

On Shadow, you can add custom events, view functions, and storage variables to any verified contract without any gas, contract size, or deployment constraints.

The way it works is the user modifies the contract source code of the original contract, and adds code to declare new events and emit those events. Shadow forks run on a slightly modified version of the EVM, that has no gas costs or contract size limitations. Shadow compiles the modified "shadow contracts", and then deploys the bytecode at the same contract address as the address on mainnet. Shadow also ensures that we don't run into out of gas errors and that the shadow fork ETH and token balances are always in sync with mainnet. When mainnet transactions are executed on the shadow fork, the custom "shadow events" are emitted on the shadow fork.

The codebase you see is one that I'm modifying, and will deploy on a shadow fork. Your task is to guide me in writing modified shadow contracts. I want you to answer my questions in concise terms, always review the entire codebase in detail before answering, and provide specific examples with code snippets. When I ask you to write me code, it should always to be code that I can successfully compile and deploy as a shadow contract. Include comments to explain what you are doing, and double check your work. Do not use pseudocode.

When providing answers and code that I can use, always double check to review the entire function scope and ensure that it will not run into a stack too deep Solidity compiler error. Use helper functions and structs to help avoid the stack too deep error. When making recommendations for code changes, always seek to minimize code changes to the original parts of the smart contracts. Never add new function parameters to the original functions in the contract, or add completely new files to the contract. Be sure to double check all the other files within a contract that might need a modification as a result of a modifications you recommend.
Open the AI Chat in Cursor (right side bar) and click on the "More" tab
pragma solidity =0.7.6 is shown at the top of the file
Write short snippets of Solidity code to declare and emit shadow events
Use ChatGPT tools to help you out when you get stuck (see recommendations below)
If you're a non-Solidity engineer, it'll be easy. You'll be able to use Shadow within 1-2 hrs.
If you're a data analyst that doesn't know any Solidity at all, you'll be able to use Shadow effectively within a few days. Some shadow events are easier to write, so you may even be able to get things working within a few hours. Many people who primarily have a SQL skillset have learned enough to use Shadow effectively, so don't be deterred!
We'll walk you through the steps to get started with detailed instructions and screenshots, and also provide tips on common issues that may arise as you create your own shadow events.
We highly recommend Solidity beginners to use these tools in order to use Shadow effectively, and have written detailed instructions with screenshots on how to get them set up.
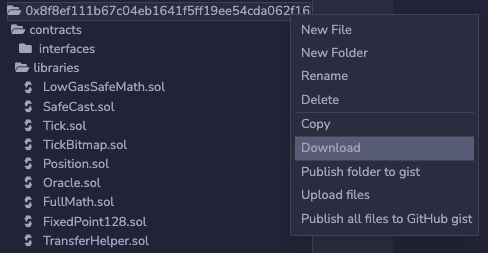
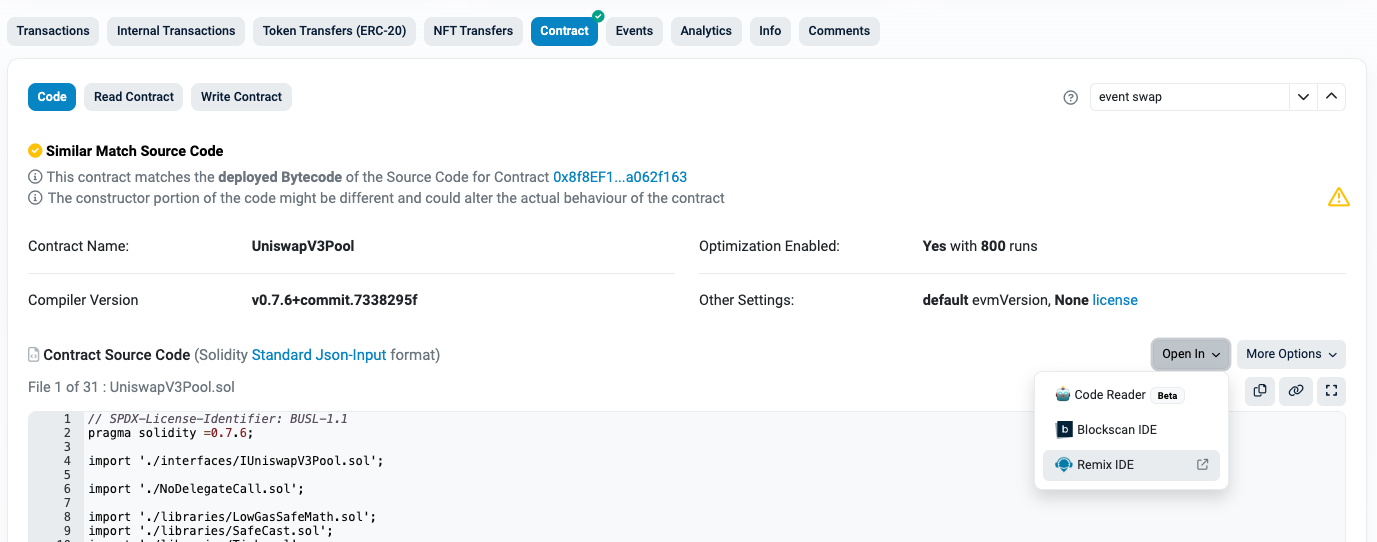
You can also download from Etherscan using Open In > Remix IDE from the Contract tab.
This will open a new Remix tab
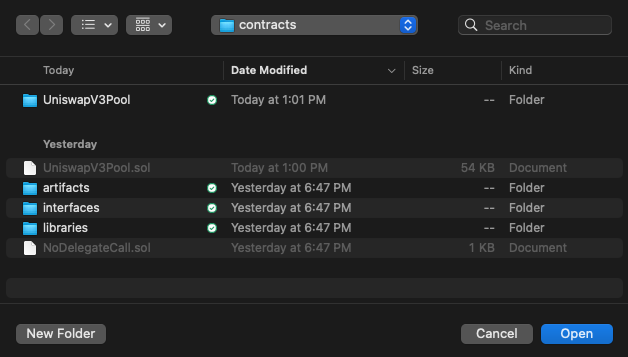
Right click the folder with the contract address and select Download
Open a new Cursor window > Open from folder> open the folder with the contract address
After this step, you should have a folder with the .sol file(s) from the contract imported into Cursor. Most contracts will have multiple folders, subfolders, and .sol files within each. This may look intimidating at first, but you'll usually only need to modify 1-2 files to add a shadow event.
The first step of adding a shadow event is to declare it somewhere in the contract. This makes your contract aware of the event and its data parameters.
To keep things organized, you should try to declare your shadow event where the contract's other events are already declared. Search the codebase for "event" – it's usually pretty easy to find.
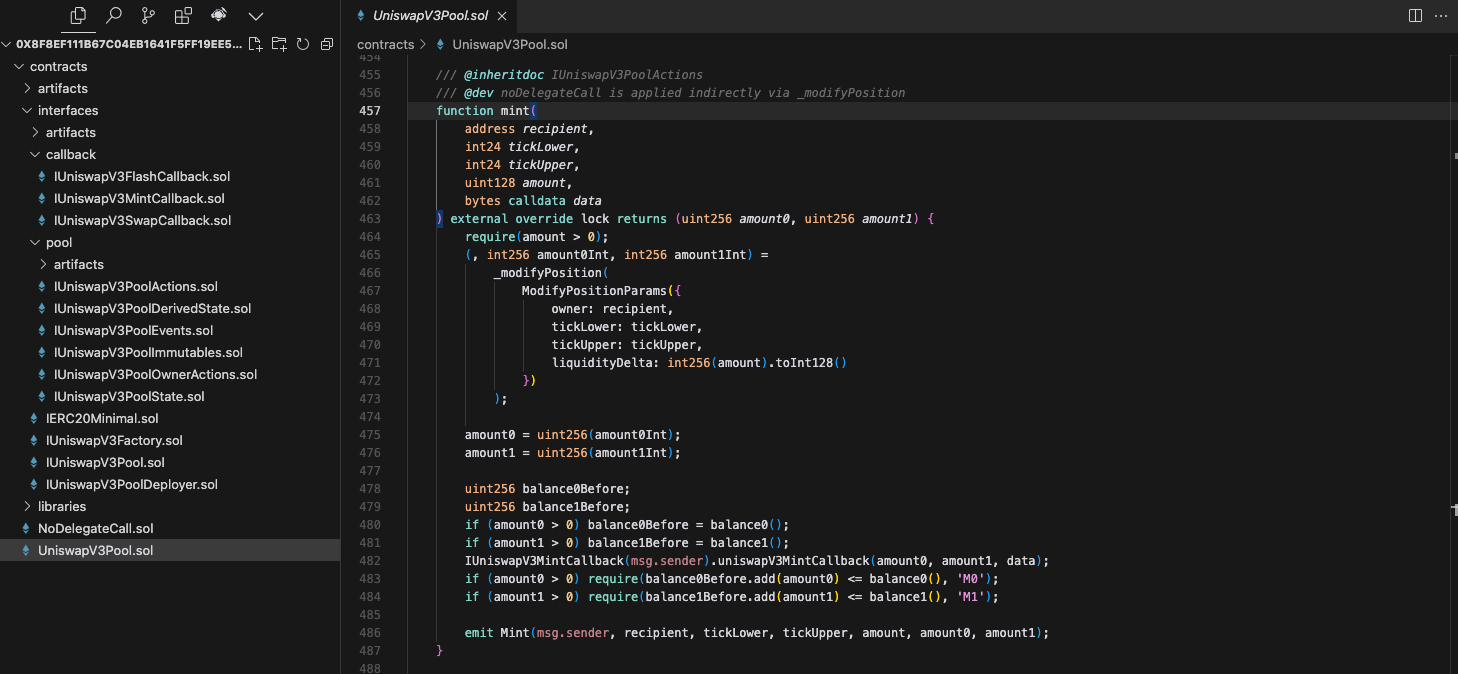
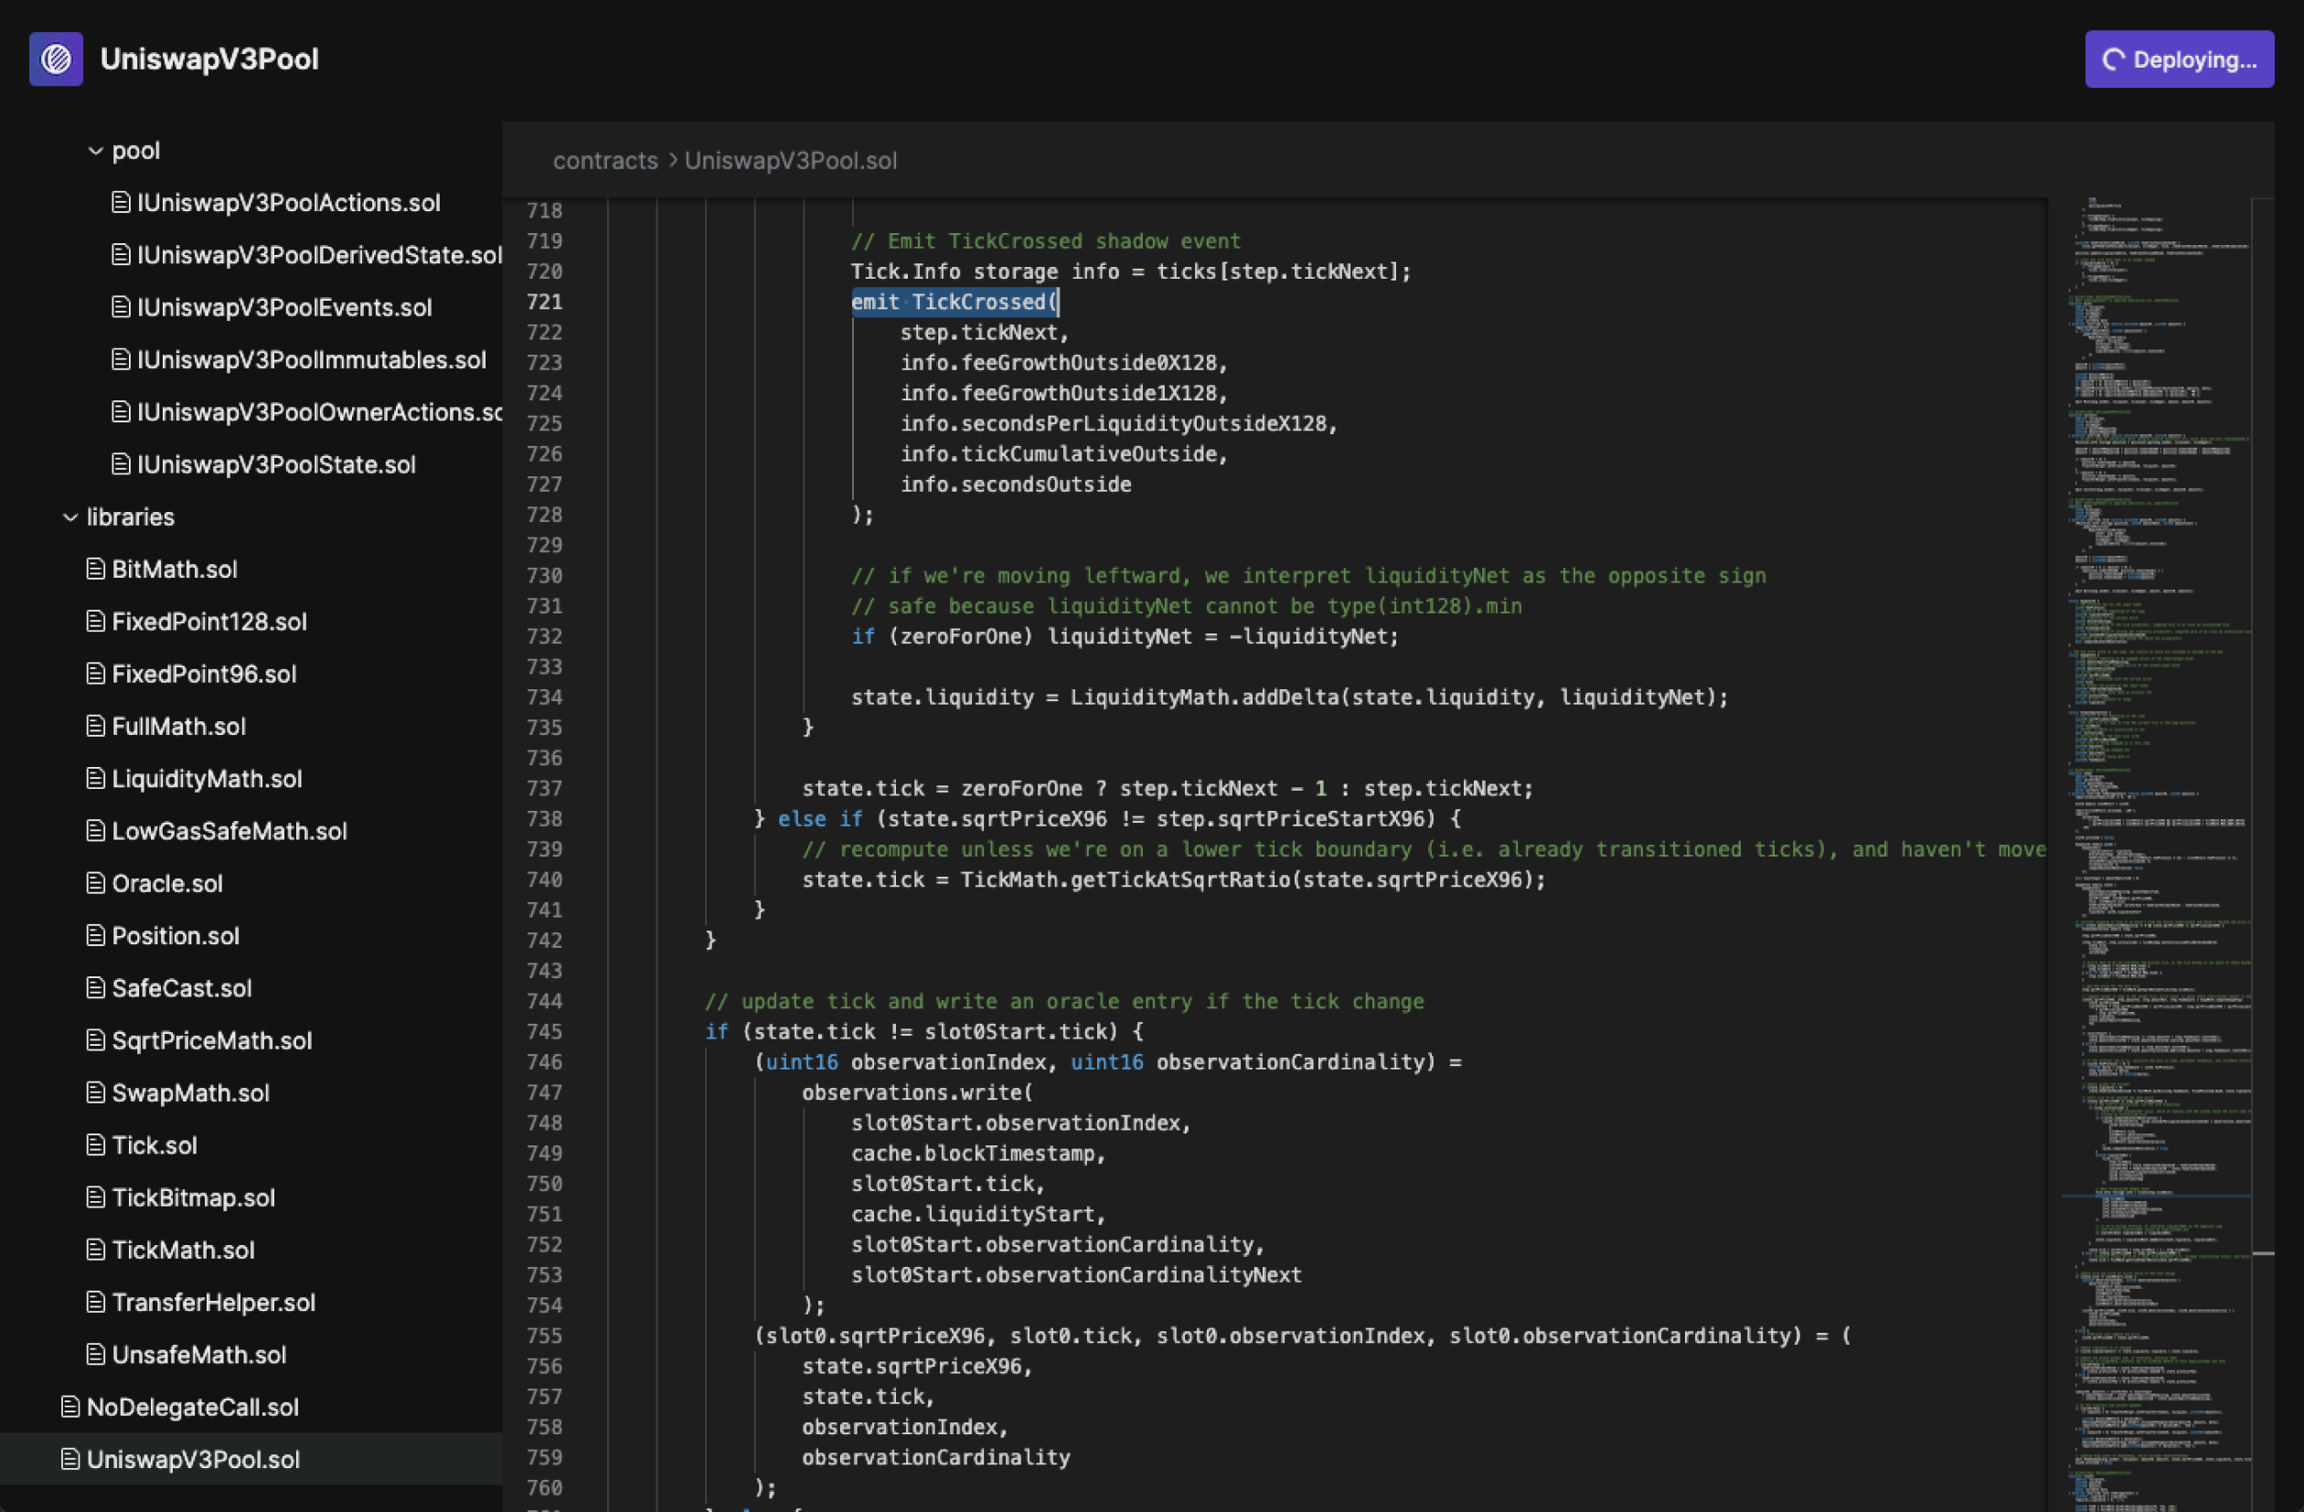
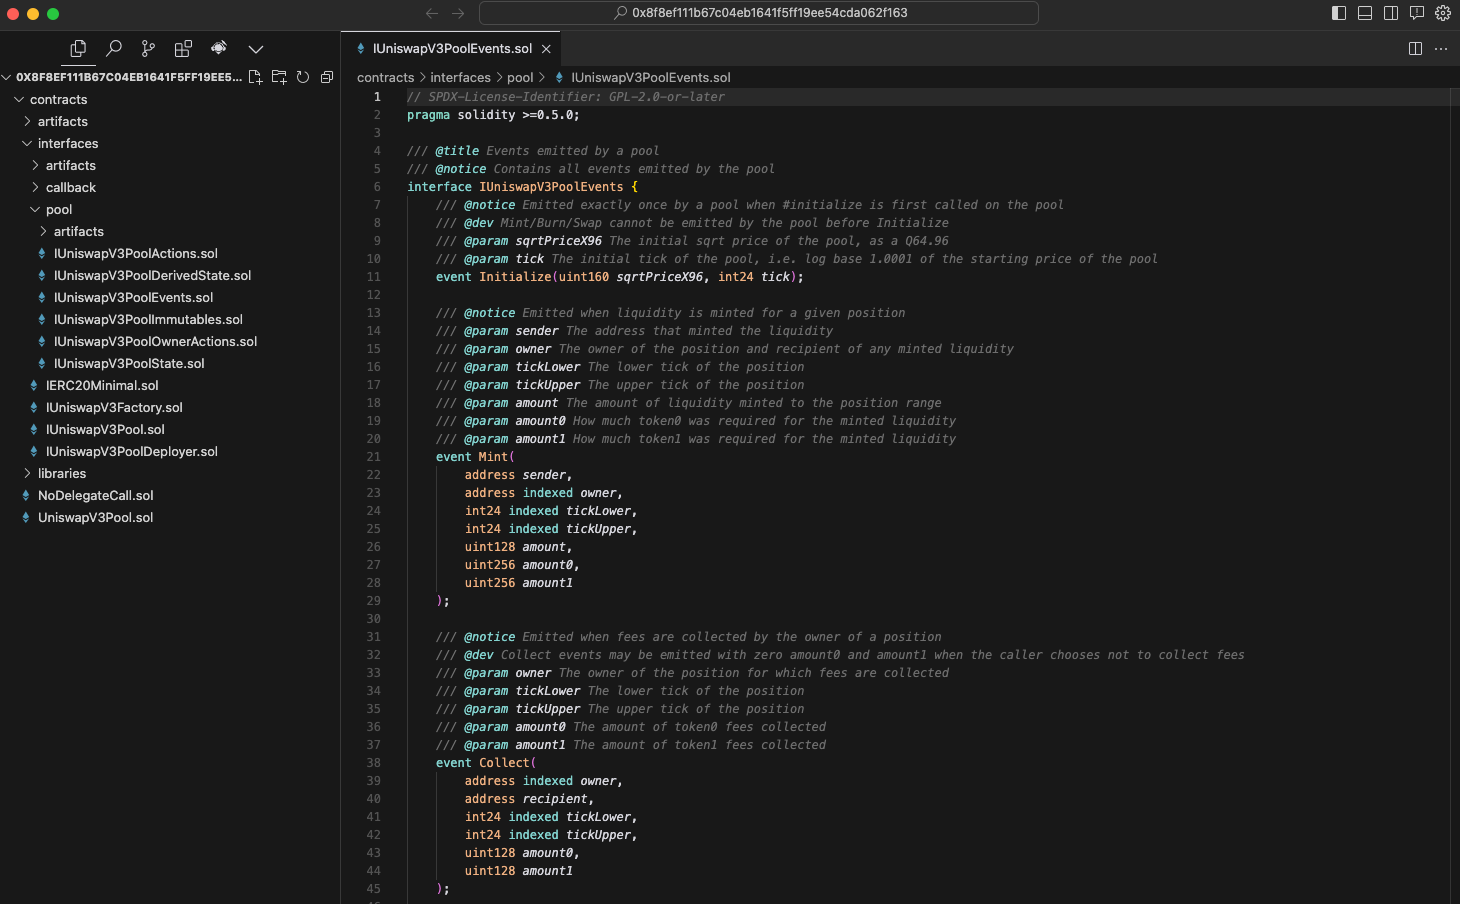
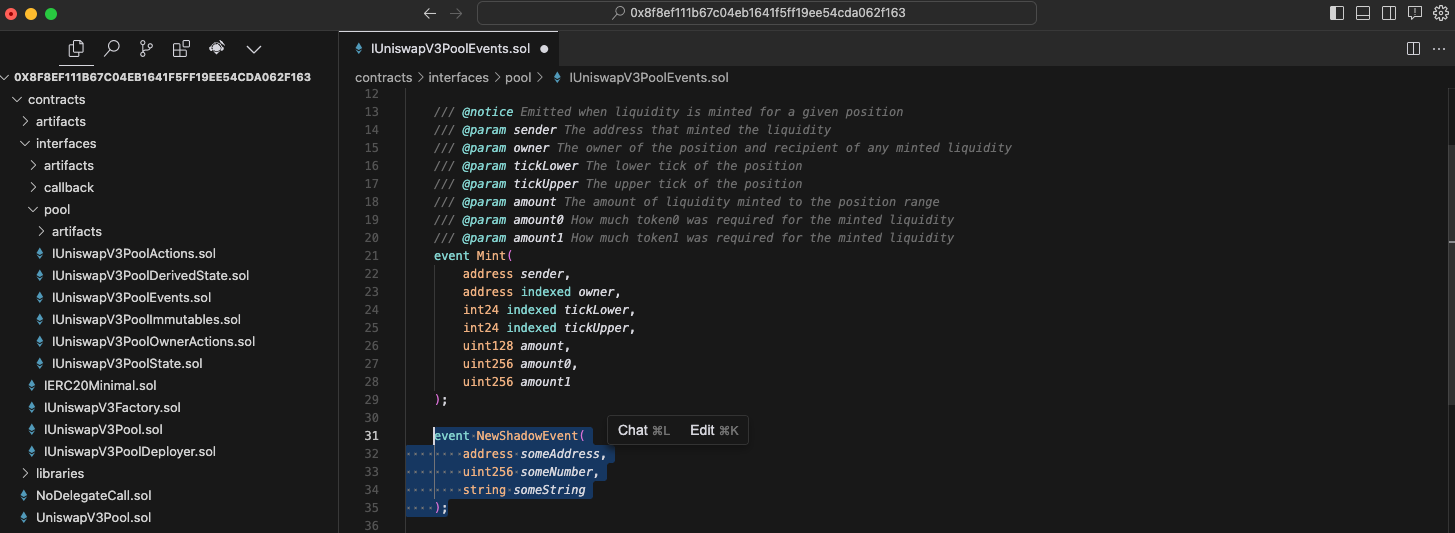
In the UniswapV3Pool contract, events are declared in the IUniswapV3PoolEvents.sol file
You'll see all the events that already exist in the publicly deployed version of the contract
Declare your new shadow event where the contract's existing events are declared.
If you don't need to add a brand new event and instead just want to add data parameters to an existing event, you can do that too. If you're modifying an existing event, it's helpful for readability to rename it by pre-fixing "Shadow" to the name, e.g. ShadowMint
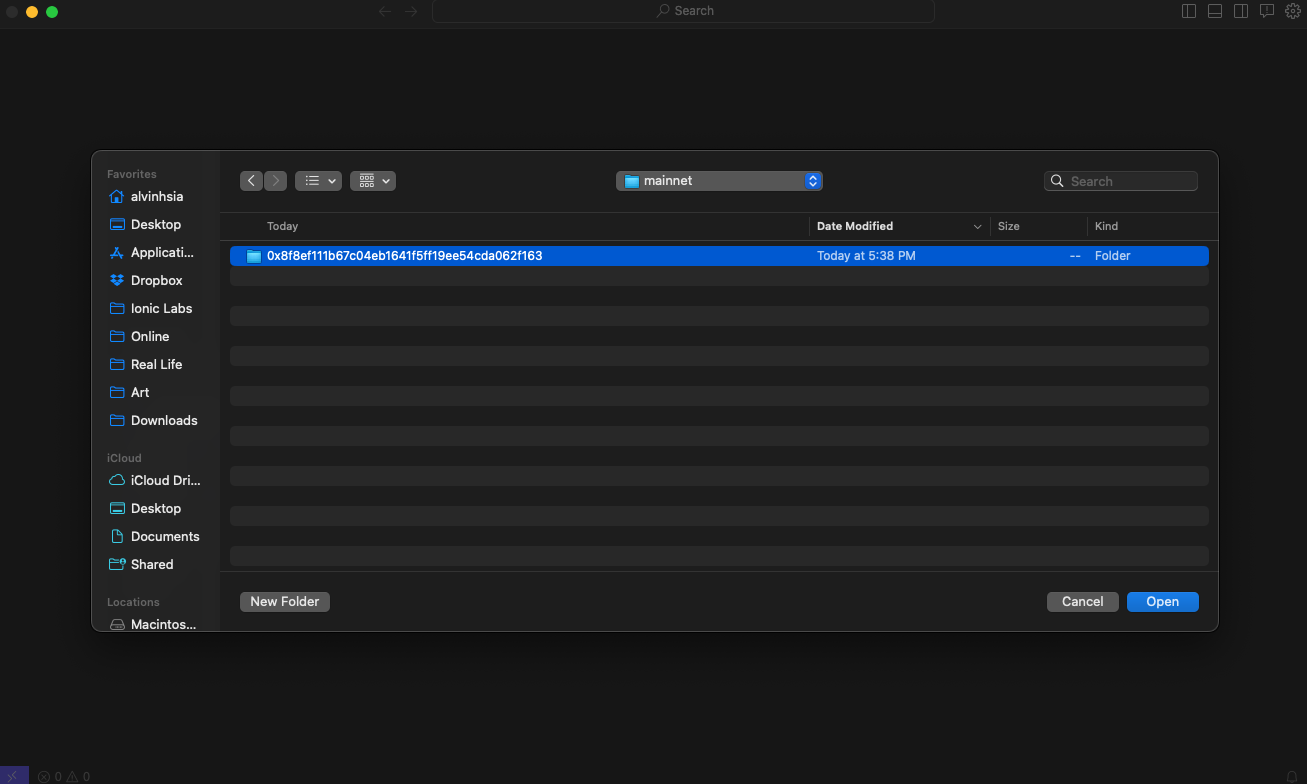
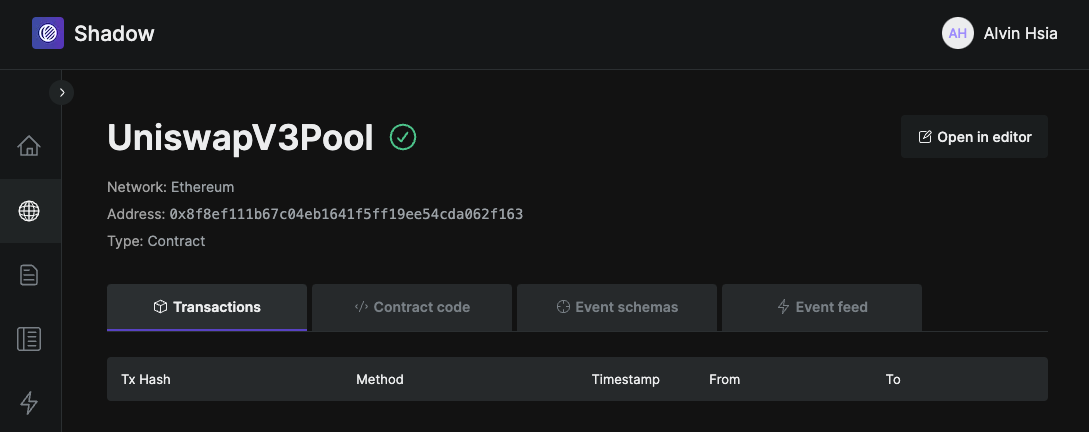
Go to the contract page on app.tryshadow.xyz. The URL of the page should look something like this, with the contract address replaced and using your unique project_id at the end.
Click on the Open in editor button in the top right corner.
Copy paste your modified code into the right .sol files, and click Deploy. If you modified multiple .sol files to add your shadow event, be sure to replace the contents for each one.
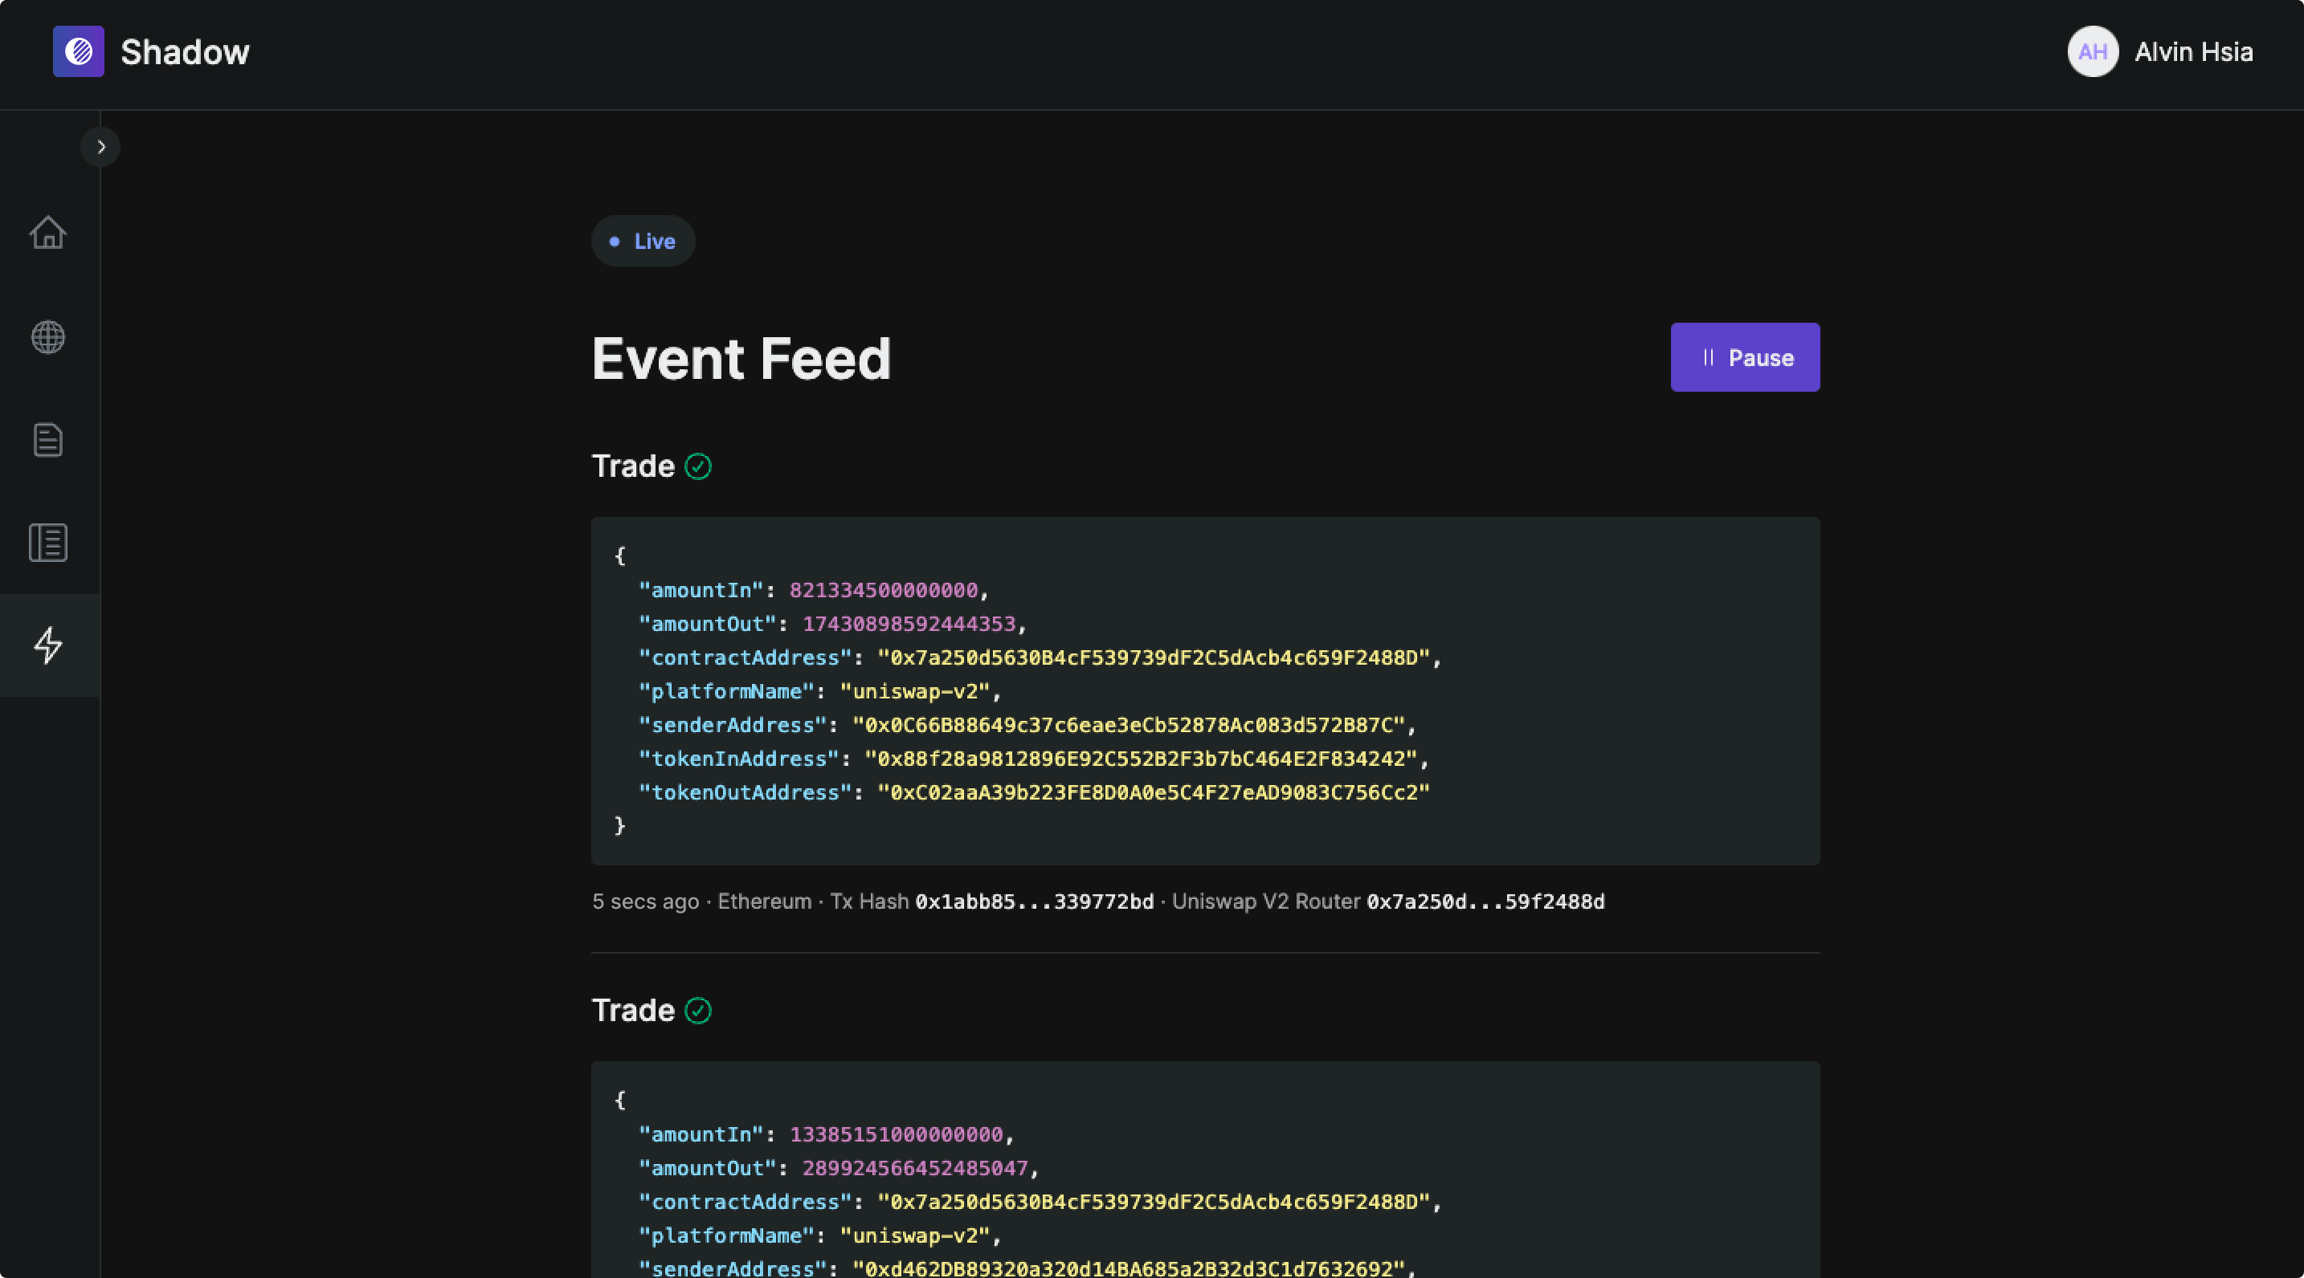
Once deployed, you can see your shadow events happening in realtime on the Event Feed tab.
You can also access your shadow event data via RPC, streams to your own database, or a Shadow hosted SQL API. Please talk to us if you're having trouble deciding or setting that up.